
Orca for Everyone (1): Starting with Solana
herehere
Orca for Everyone is a guide to entering the DeFi world provided by the team behind Orca, the most user-friendly digital currency exchange on Solana.
Hey look here!
Want to explore the vast ocean of cryptocurrencies but don't know where to start?
Welcome to Orca: the friendliest exchange in the crypto world.
Working with cryptocurrencies may seem daunting, but our mission is to show you how easy, simple and fun it can be.
In this episode of Orca for Everyone, we'll show you how to start your cryptocurrency journey. You'll learn the basics of how to buy cryptocurrencies with regular money, and how to set up your wallet so you can use it to explore the fascinating world of decentralized finance.
But before we set sail, let's cover the basics...
An introduction to the crypto world and DeFi
You may have heard of Bitcoin, which is widely considered a form of "digital gold": a store of value that rivals paper money (although this view is disputed!)
Today, many areas of cryptocurrency offer alternatives to traditional financial systems, such as banks and financial markets. This crypto space is known as decentralized finance, or “DeFi.”
Simple, fast, and fun, Orca is a decentralized exchange, or DEX: users can trade cryptocurrencies and earn income without relying on any bank or broker.
What makes all this possible is the foundation upon which Orca is built: the Solana public chain.
Due to Solana's low cost and ultra-fast transaction speed, Orca users don't have to worry about many of the problems that DeFi applications face on older blockchains such as Ethereum.
Solana's native payment method is a cryptocurrency of the same name, often referred to by its code SOL (yes, the two have the same name, this can be a bit tricky!) SOL makes the Solana ecosystem work, and you will It is needed to use DeFi applications like Orca.
secondary title
Step 1: Purchase SOL
Buying SOL with regular currencies such as USD, EUR, GBP and JPY is very simple. This can take a few days to complete the process, so this is the first step in your DeFi adventure.
First, you will need to set up an account with a cryptocurrency exchange (“centralized exchange”) that accepts fiat currency deposits. In this example, we will use the cryptocurrency exchanges Coinbase (recommended for users residing in the US) and FTX (recommended for non-US users). For mobile users, both Coinbase and FTX are available on the iOS App Store and Google Play Store.
While you're still learning the ropes, it's well worth starting with small purchases to get a feel for the crypto market - preferably no more than you'd feel comfortable losing. You don't want to be stumbling off deck until you're sea-adapted!
But beware: Coinbase has a minimum withdrawal limit of SOL (SOL is 1.12 at the time of writing). That said, you don't need to be a big fish to join Orca's happy hour! If you want to start your adventure with a small amount of SOL, consider FTX or FTX US, they have no minimum withdrawal requirements.
Once you click "Sign Up" on either site, you'll be directed through the process of setting up an account and verifying your identity. Once done, you can log in and get some SOL!
Coinbase: Click "Buy/Sell" at the top right of the home page. choose" Solana "Then there is the payment method of your choice.
If you wish to purchase a specific amount of SOL (not denominated in USD), please click "custom" on the previous page and enter the amount you would like to purchase. Then click the Preview Order button, then click Buy Now. That's it!
FTX: After logging in, click on "Fiat" at the top right of the home page.
Then click "Deposit by Card" and follow the instructions to add your debit or credit card as a payment method (you will need to complete FTX's Level 2 identity verification to complete this step).
Once done, you can fund your FTX account with your debit or credit card.
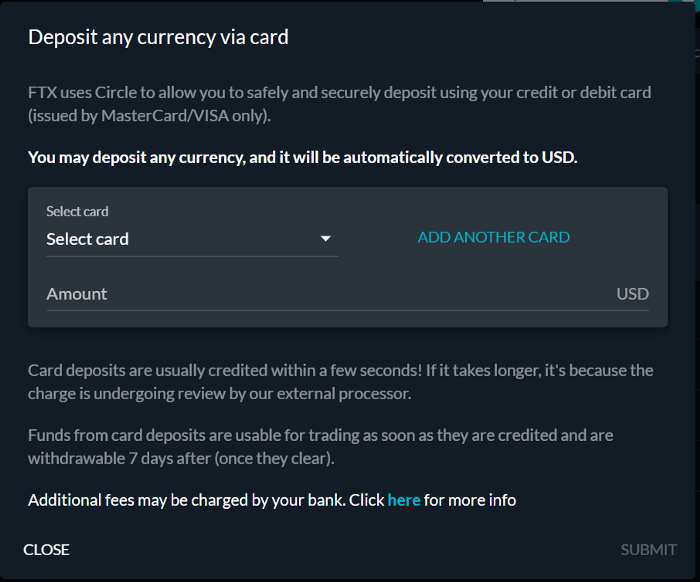
Note that all currencies deposited this way will be automatically converted to USD. Of course, it doesn't matter because we're buying SOL!
Once you have some dollars in your account, it's time to get some SOL. Using the search bar at the top of the screen, type in "SOL" and select the "SOL/USD" currency pair.
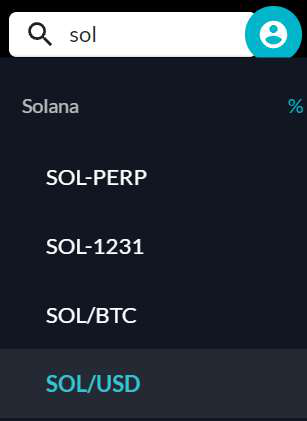
This will take you to a market to buy or sell SOL tokens for USD. There's a lot going on in this page, but don't get overwhelmed by all the blinking indicators and brightly colored charts. For our purposes, only one element of this page is important - scroll below the diagram to find it:
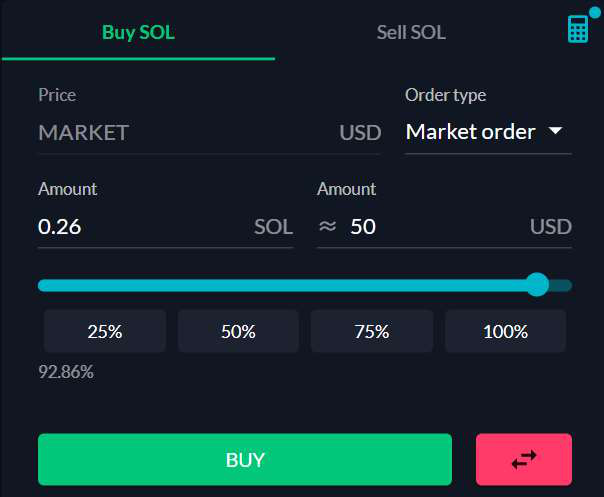
Here we will buy SOL. To ensure our buy order is filled quickly, we will use a "market order", which will be executed at the current market rate rather than at a specific price: select it under "Order type". Then, enter how much you want to buy (in the example above, $50 worth) in the USD column, and click "Buy." Your order will be fulfilled immediately.
secondary title
Step 2: Set up the wallet
Well done, you now have some SOL!
But don't celebrate just yet; your adventure is just beginning.
You will not be able to explore the Solana ecosystem and its many opportunities by holding your SOL on a centralized exchange. You need a DeFi wallet that supports Solana.
If you plan to use your web browser on this expedition, we recommend Phantom, an easy-to-use browser extension wallet. After installing Phantom, you can find it in the extensions bar at the top right of your browser window, next to the address bar.

For easy future access, click the puzzle piece in the upper right corner of the window, then click the pin icon next to Phantom in the drop-down menu.
If you prefer to use your phone, you can use web wallets like Solflare (beta) or Sollet, which are available in mobile web browsers.
secondary title
Step Three: Determine Your SOL Address
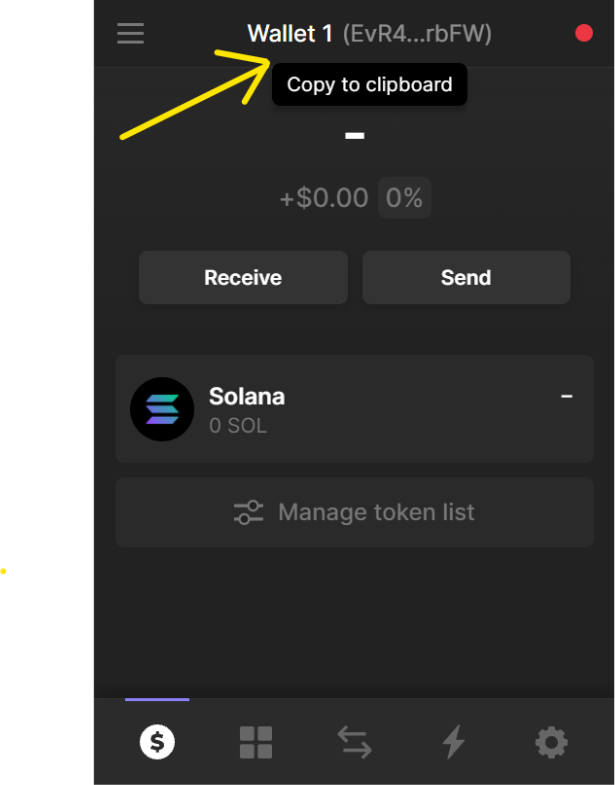
Now that you have your wallet, it's time to find your Solana address.
This is also known as your "public key" and it functions like your bank account number. Each address is a unique string of 32-44 characters of letters and numbers. You will need this address if other people want to pay you on the Solana blockchain, or if you want to fill your wallet with SOL.
Don't worry, you don't need to memorize or print it out. Often it is simply copy and paste!
We'll use the Phantom as an example. Start by opening Phantom in your browser, and simply click on your wallet name (if you haven't given it a special name, it defaults to "Wallet 1").
secondary title
Step 4: Send SOL to your wallet
Back to Coinbase or FTX.
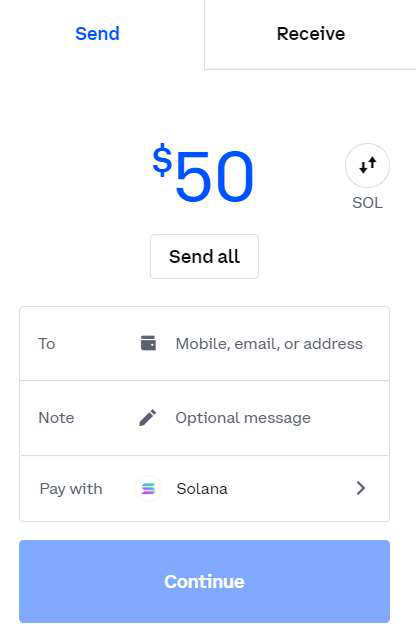
Click the white "Send/Receive" button in the upper right corner of the screen. Select Solana in the Pay with box. In the "To" box, paste the address you copied from your wallet earlier.
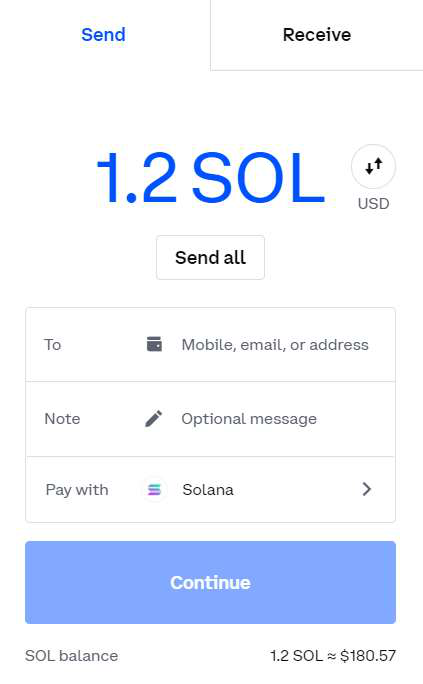
When specifying how much SOL you want to send, keep in mind that there is a minimum withdrawal requirement of SOL on Coinbase. Once you have entered your SOL, click "Continue" and confirm the withdrawal.
FTX: Click on "WALLETS" in the upper left corner of the homepage, then scroll down to Solana and click on "WITHDRAW".
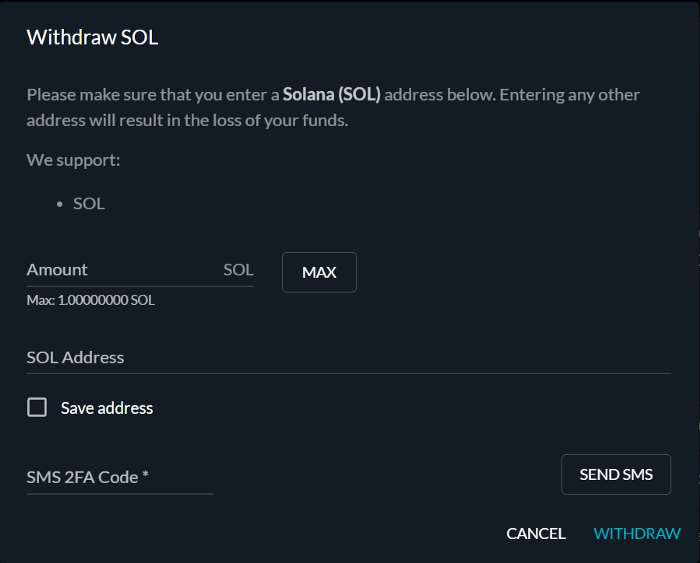
Enter the amount of SOL you want to send (there is no minimum withdrawal amount on FTX), and the Solana address you copied earlier from your new wallet. Complete the 2FA authentication process (in the image above, a text message) and click "WITHDRAW". Once you have sent the SOL from your trading account to your wallet, open the Solana wallet you set up earlier and wait for the SOL to arrive. Solana has shorter (and cheaper) transaction times than other blockchains, typically seconds and transaction fees of only pennies! However, sometimes centralized exchanges like Coinbase and FTX will take longer (This is another reason why we chose DeFi!), so you have to wait a while for your SOL to show up in your wallet, don't worry too much.
Congratulations: you are now an owner of some SOLs and a user of the Solana blockchain!
You're swimming on the waters of Solana right now, but the best is yet to come!
While SOL is a remarkable asset in its own right, the real wealth of the Solana ecosystem lies much deeper:
It's very easy to get (if you take the risk!) double-digit or even triple-digit gains...
Not just digital assets, but also digital treasures like nft...
And lightning-fast cross-border payments — anytime, anywhere.
Sound too good to be true? It's all there, waiting for you. But don't take our word for it! We want you to explore for yourself. And that's what we're going to show you in the next chapter of the voyage.
In Chapter 2, we’ll show you how to explore the DeFi world by doing your first “swap” — the term for exchanging one cryptocurrency for another — on Orca.
In the meantime, welcome to the whales!
To be continued...


