Full interactive guide: NFT session of Linea's "Great Voyage Project" under ConsenSys
Linea is a new zk-rollup network developed, designed and operated by ConsenSys, fully compatible with the Ethereum Virtual Machine (EVM). Its goal is to be a "bytecode-compatible level" of zkEVM, making it easier for developers to build and maintain applications on Layer 2. In December last year, Linea launched a private testnet and ran it for three months, with a total transaction volume of 1.5 million.
To encourage early users to use the public testnet, the event will last for 9 weeks. Users can explore the Linea ecosystem, participate in weekly challenges and collect points to claim exclusive Linea NFT."To encourage early users to use the public testnet, the event will last for 9 weeks. Users can explore the Linea ecosystem, participate in weekly challenges and collect points to claim exclusive Linea NFT.
What are NFTs good for? The ultimate goal of Linea Voyage is to prepare for the launch of the mainnet later this year through testnet activities. For this reason, the official has prepared four "versions" of NFT as incentives, and each version corresponds to the score threshold accumulated by Voyage this time. In addition, if the Linea testnet exceeds 30 million transactions before the end of Voyage, the official will provide all participants with an additional commemorative NFT - the commemorative NFT does not mean that there will be Linea tokens in the future(Odaily Note: In other words, there is a high probability that the first four versions of NFT will have token airdrops)。
At present, the activity has been going on for two weeks, the first week is cross-chain (total score 116 points), the second week is community activities (15 points, it doesn’t matter if you miss it). The theme of the third week is NFT (May 16th to May 21st), with a total score of 109 points and a total of 20 small tasks. The partners of this week's task are ghostNFT, NFTs 2 me, Zonic and Bilinear, task link:https://galxe.com/Linea/campaign/GCEMnUEySZ
Lieaa test network (click to query network information)Lieaa test network (click to query network information)And get the test coin Goerli ETH:
0.5 GETH on the Linea chain (click to jump)0.5 GETH on the Linea chain (click to jump), but the current faucet is faulty and waiting for repair;
"Linea (ConsenSys zkEVM) Testnet Interaction Guide""Linea (ConsenSys zkEVM) Testnet Interaction Guide"。
secondary title
NFTs 2 me (5 tasks, 28 points)
Task 1: Create and deploy a new NFT project on the Linea testnet (10 points)
click to enterNFTs 2 me official website (click), connect your own MateMask wallet for authorized login; NFTs 2 me provides three ways of NFT casting, namely:
Editions, you can use one artwork to create multiple NFTs; if you can't create it yourself, you can use AI assistance.
Drops, you can choose different artworks for each NFT to form a collection.
Generative Art, an advanced mode, can use the generative art editor to combine into different image layers (even using PSD) to generate thousands of different NFTs.
(Note: Select the first simple mode Editions directly.)

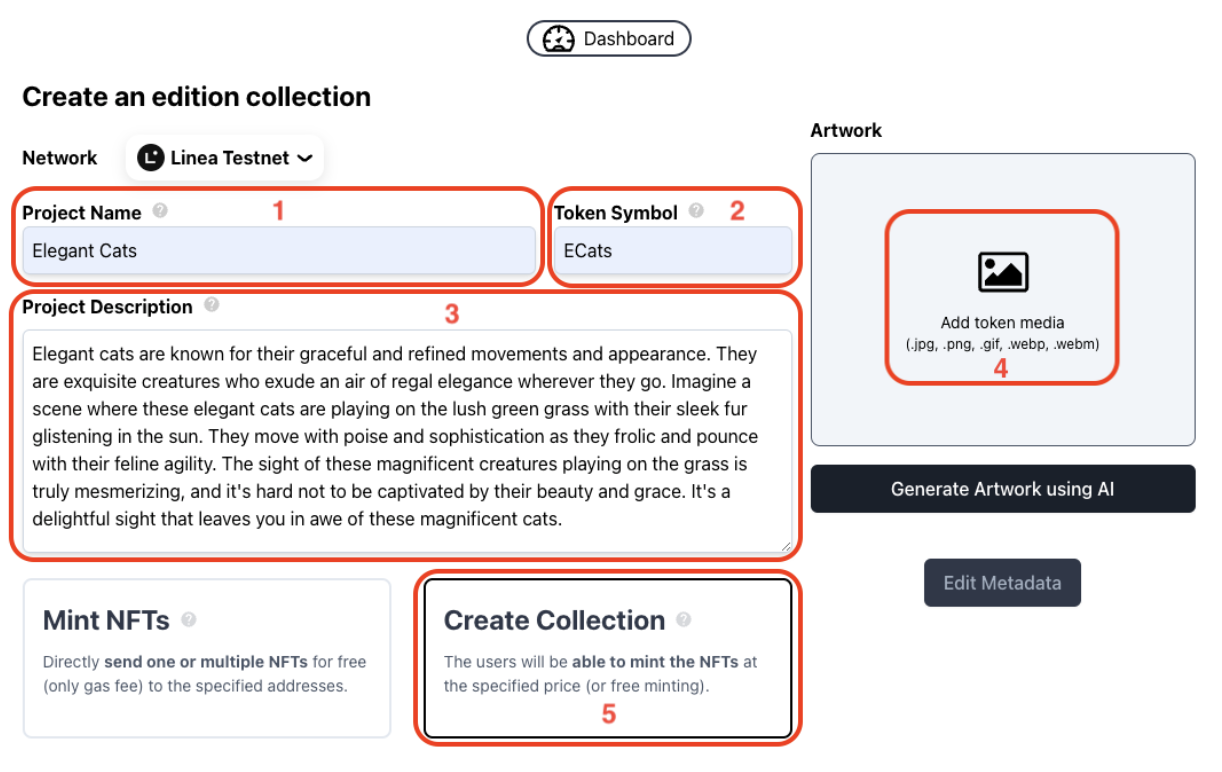
After clicking Editions, you need to set the parameters of the NFT. The specific steps are as follows: (1) Set the "Project Name", which is the name of the NFT; (2) Set the "Token Symbol", the future NFT collection symbol; (3) Set " Item Description"; (4)"add token media", just upload your pictures or videos directly, or you can click "Generate Artwork using AI" to use AI to create images through the project name and description); (5) Click "Create Collection"; (6) Set "Minting Fee", that is The price that other users must pay to mint NFTs, you will receive a fee for each minting, set 0 to mean "free minting"; (7) set "Edition Size", the maximum number of NFTs minted in this series; (8) click "Deploy to Linea Testnet"; (9) After clicking "Deploy to Linea Testnet", the picture will be uploaded to IPFS, and then the transaction will be confirmed. Click "Confirm" to create a contract for the new NFT.
So far, you have deployed a new NFT project on the Linea test network. After confirming the transaction, a control panel will appear, which contains information related to your NFT project and next steps, and you can customize the address and appearance. As follows:
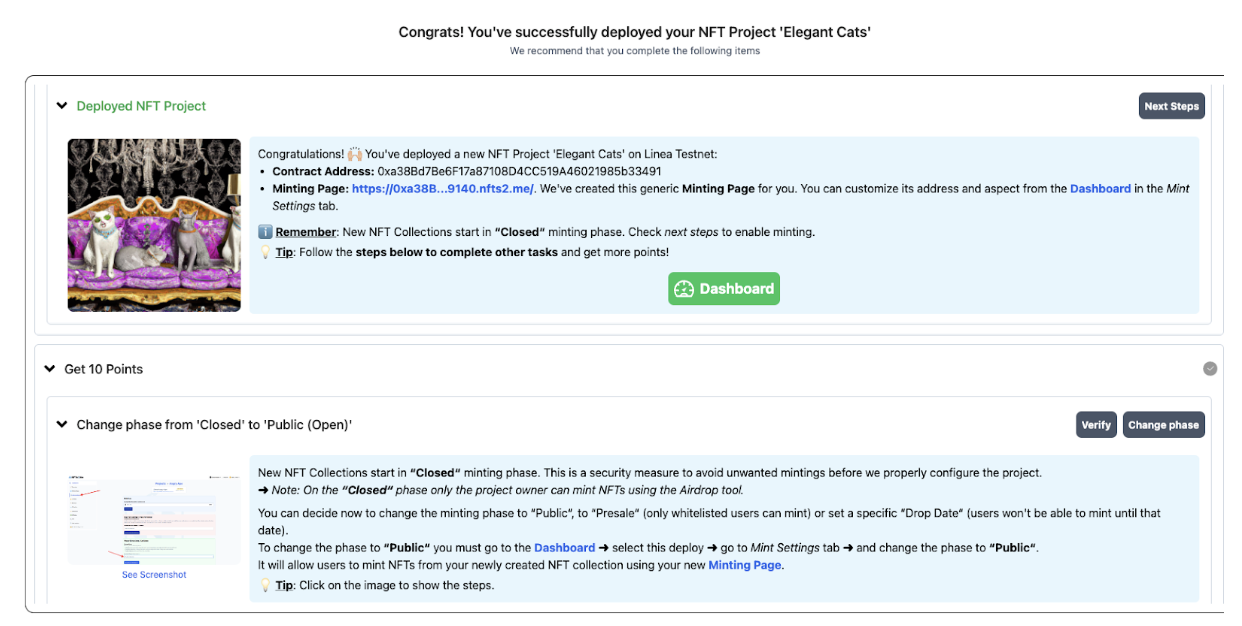
It should be noted that the NFT is still in the "Closed" (Closed) casting stage. After checking that the relevant information is correct, the public Mint can be opened, which is also the second task.
Task 2: Change stage from "closed" to "public" (3 points)
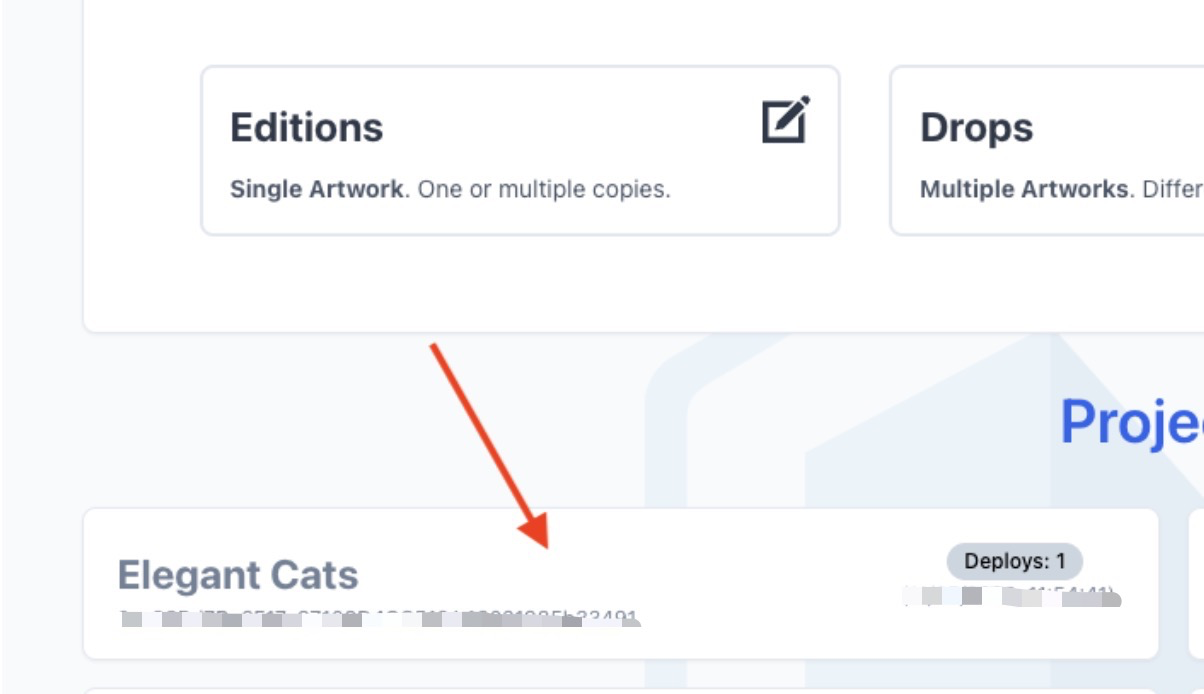
Click the "Dashboard" button, you will see all the projects under your account; click on the last created project, it will open the project's dashboard - you can configure the smart contract, set the minting page, Withdraw earnings, airdrop tokens, create whitelists, set up affiliations, and even enable credit card payments.
New NFTs start from the "Closed" minting stage, mainly for security reasons, and to change to "Public" (open), do the following: (1) Go to the Mint Settings option; (2) Change the stage to "Public ” (Public) and click"Update"(renew). The operation is as follows:
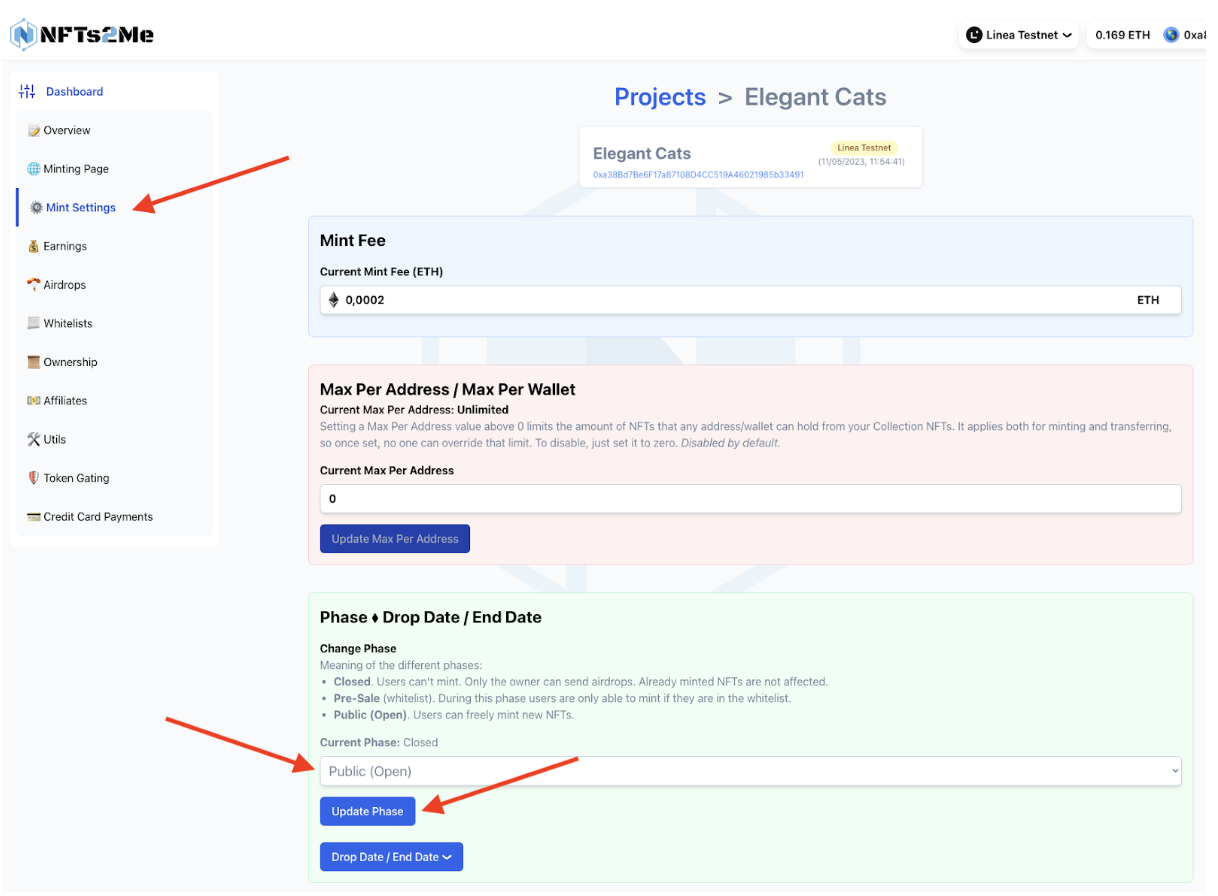
After clicking Finish, you need to send an on-chain transaction to confirm the contract status change; once the "public" is successful, all users can mint NFT on the minting page you set.
Task 3: Mint at least one NFT in the project Minting Page (5 points)
After the above steps are completed, it means that the NFT smart contract is deployed, and the system will automatically create a new Minting Page for you. Browse the Dashboard menu of the project. There is a "Minting Page" tab under "Overview". After clicking, you will see some customization options. At this time, you need to set the minting page through some parameters:
Collection URLs, with the possibility to create your own custom subdomains for minted pages;
Collection Name and Collection Description, the project name and project description are usually default, but can also be changed at any time;
Logo image, the image displayed on the minting page, changing it will only affect listings on the minting page as well as marketplaces like OpenSea;
Banner image, casting page floating page;
Featured image, the thumbnail displayed when sharing the favorite link;
Links, social links such as Twitter and Discord can be added to the minting page;
NFT Showcase, display or hide NFT on the minting page, you can set the time to open before opening the box;
Widget Cod, if you prefer to do hosted casting on your own website, customizable widget codes are available.
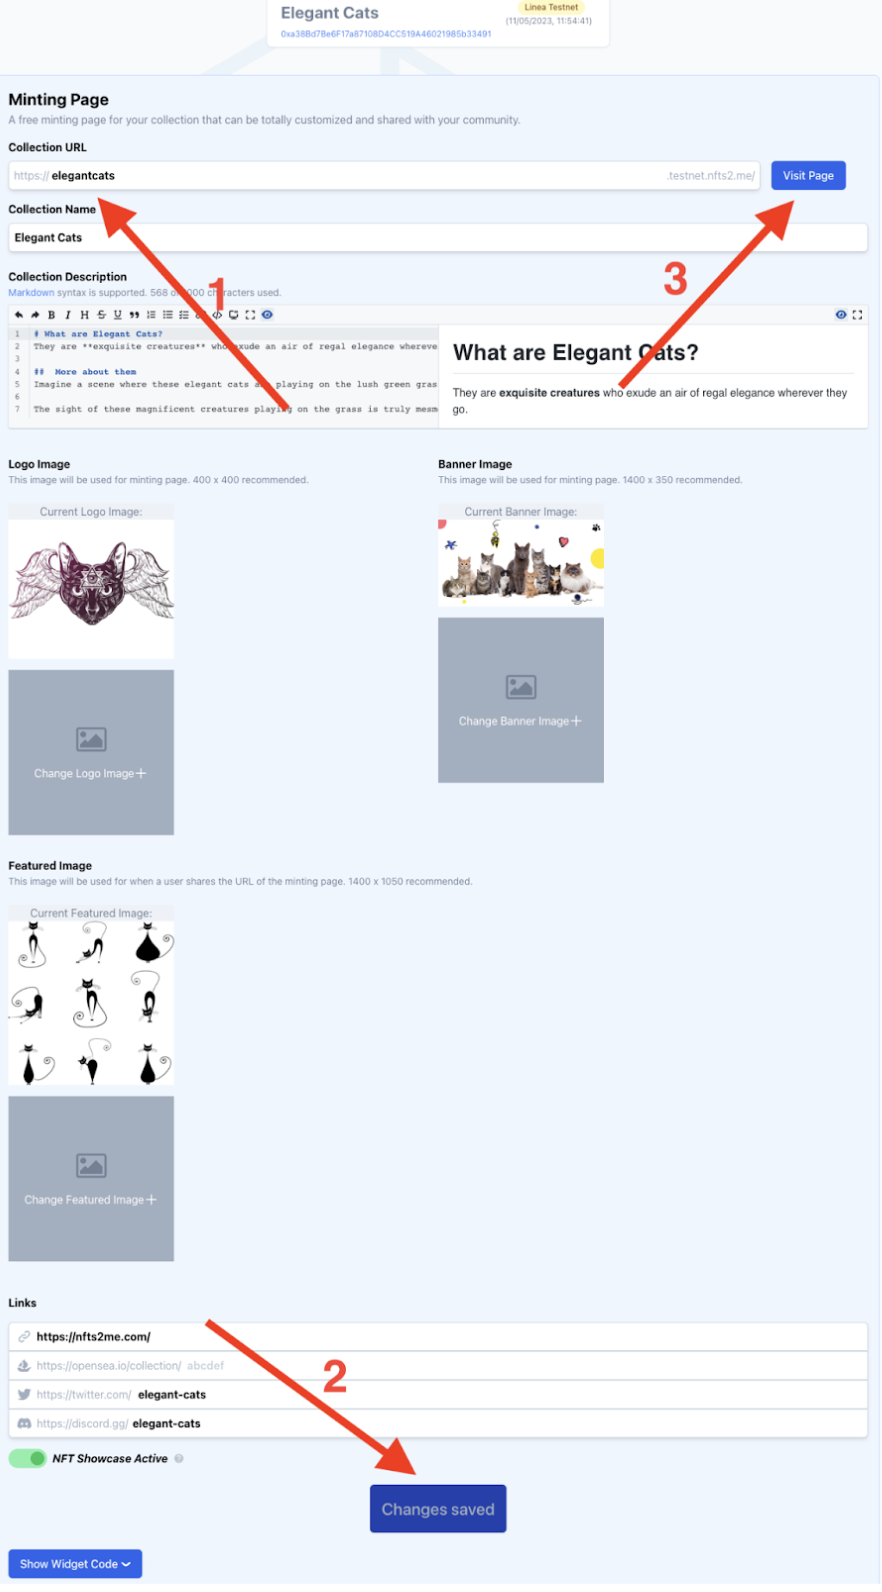
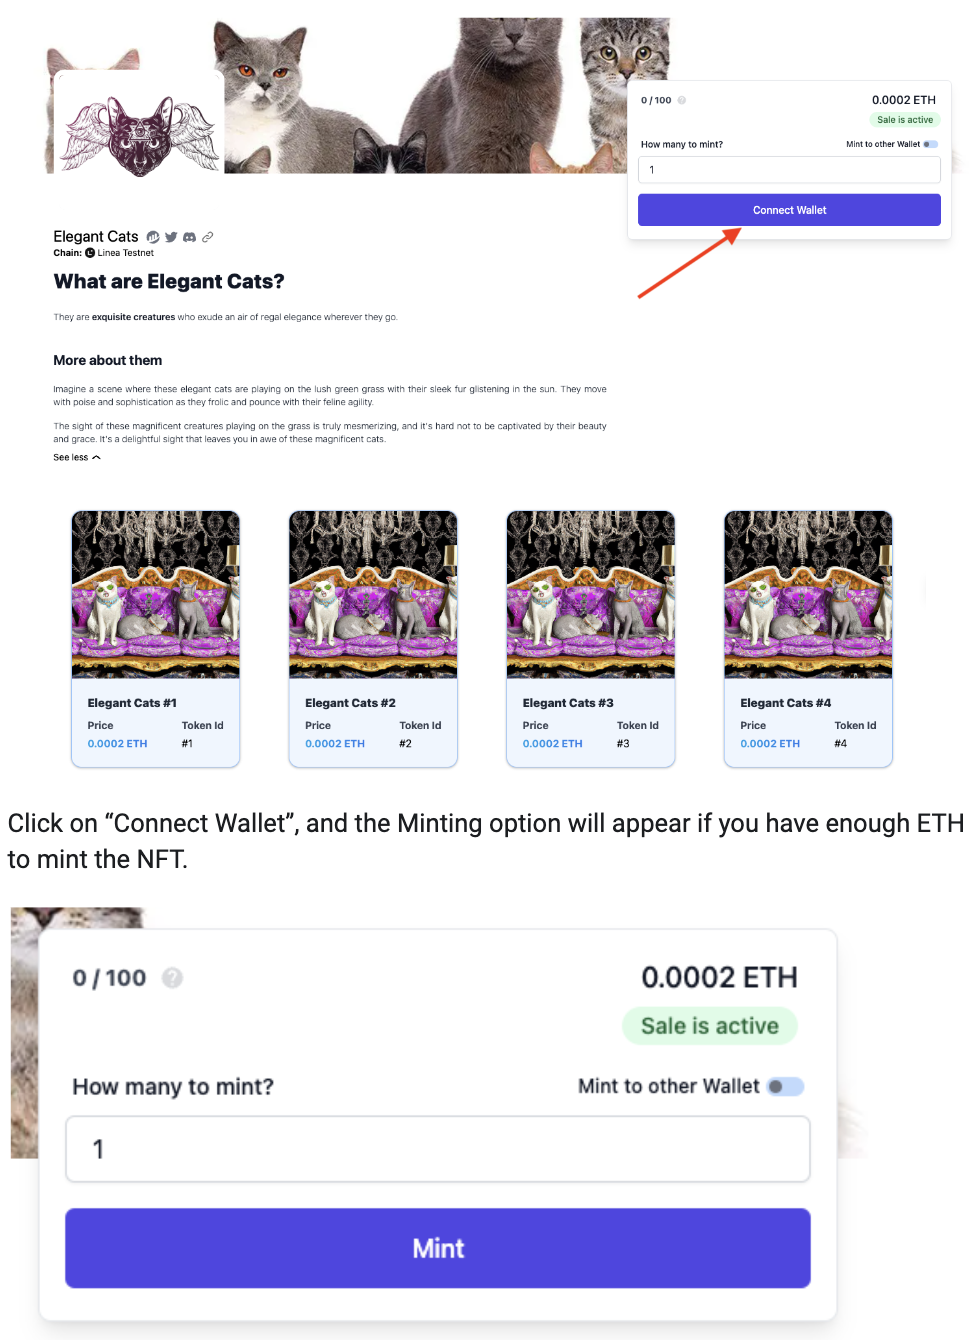
Remember to click Save after setting to avoid loss. After saving the changes, clicking "Visit Page" will open the minting page (step 3 in the diagram).
At this point, in the opened page, you only need to link your own wallet address, pay enough fees (Mint fee + Gas fee), and wait for the transaction to be completed to mint an NFT. If you are interested, you can also take a look at the NFT you minted in your browser.
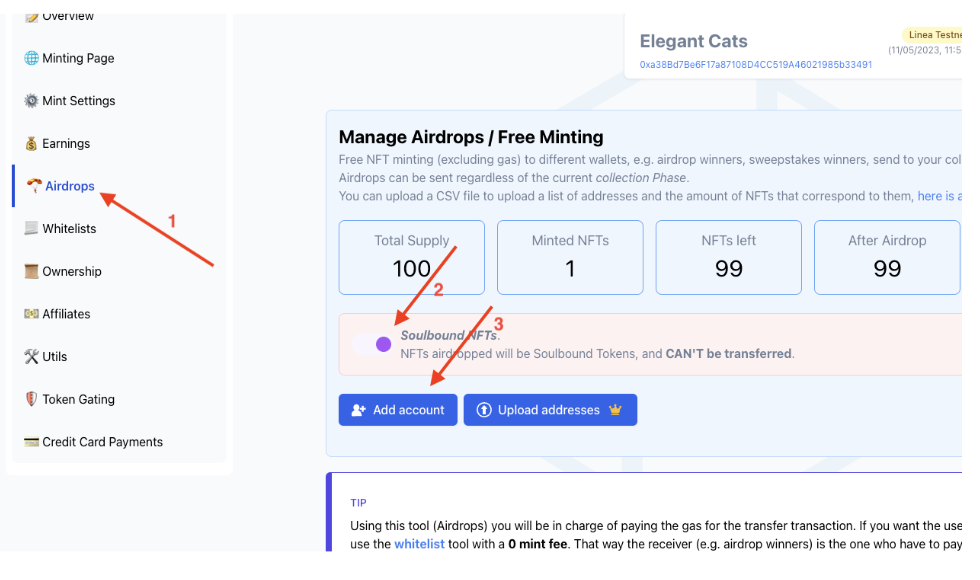
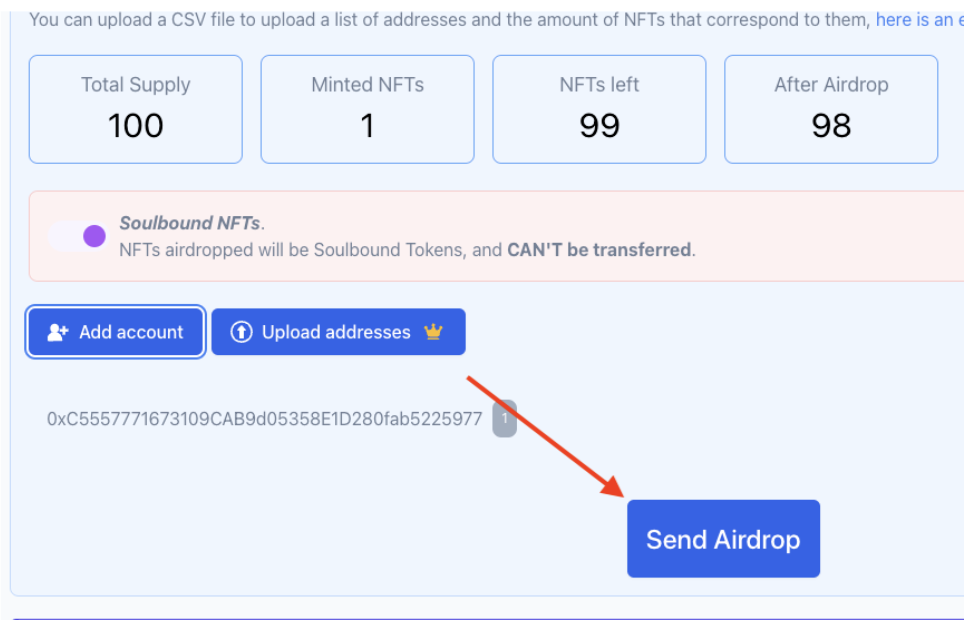
Task 4: Send Soulbound (soul binding) NFT airdrop to the official ENS address NFTs 2 me.eth (5 points)
Soulbound NFT (SBT) is a non-transferable NFT that prevents resale by the recipient. The NFTs 2 Me platform "Soulbound" airdrop operates as follows: (1) Return to the NFT project's dashboard; (2) Click the Airdrop tab in the dashboard menu; (3) Click the toggle button to change "Transferable NFT" to "Soulbound NFT"; (4) Click "Add Account". As follows:
In the pop-up window of "Add Account", we need to enter the recipient's address, here directly fill in nfts 2 me.eth; specify the number of NFT for airdrop (write whatever you want); click "Add to Airdrop". As follows:

Finally, check whether it is correct, then press "Send Airdrop", click the pop-up window on Metamask to confirm and wait for the transaction to complete. In the example, we have minted 1 NFT in Task 3 and have 99 left; after the airdrop, we will have 98 NFT left. As follows:
Task 5: Create a Token Gated Content (5 points)
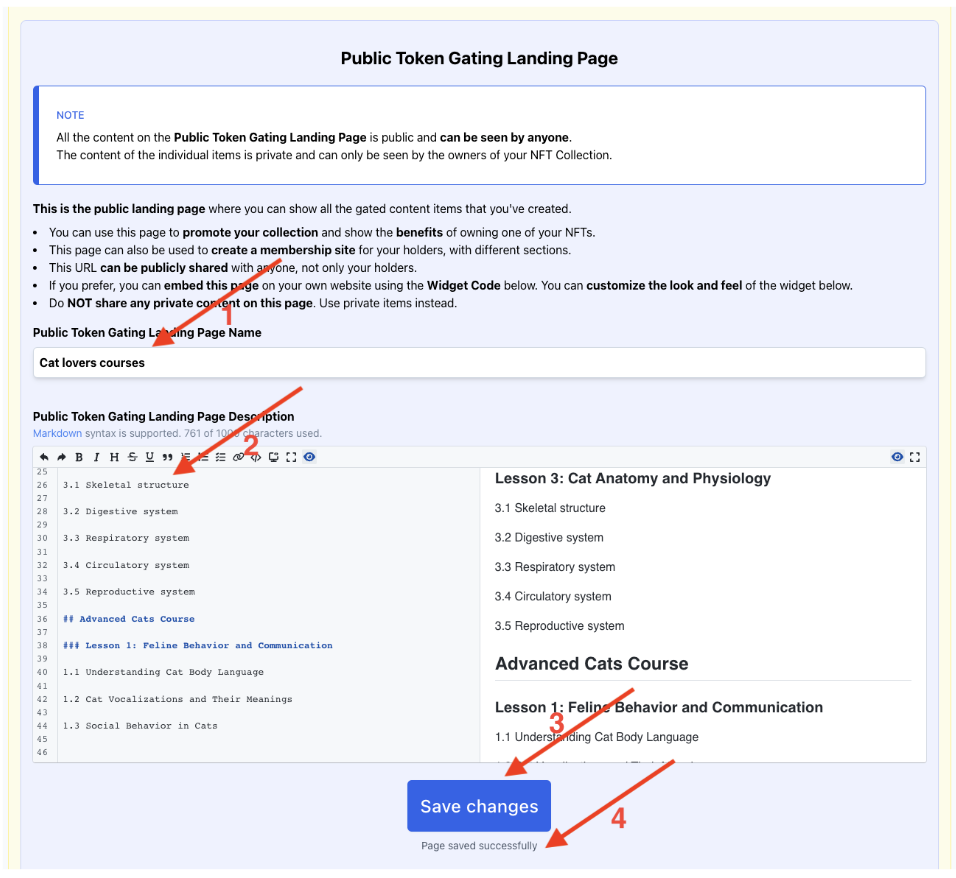
Token gating is a control mechanism that incentivizes long-term holders of NFTs by restricting their access or stake based on the tokens (or NFTs) held by users. Using the token gating tool, it is possible to create multiple pages for different gated content - such as creating a generic token gating landing page as well as individual projects, each content gated project created has a public description and a private information.
Here's how to do it: (1) Go back to the project dashboard and click on the "Token Gated" option; (2) Create a public Token Gated landing page for Token Gated content - visible to all (3) give the landing page a name, in this case "Cat Lover Course"; (4) write a description, which everyone will see before authentication; (5) Save the changed content.
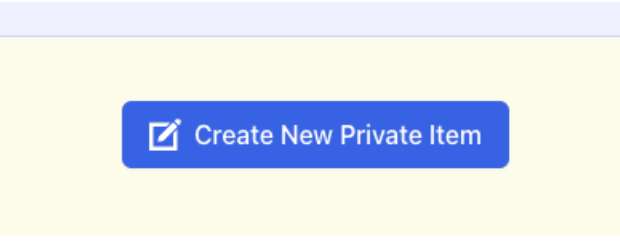
After completing the portal content login creation, we need to create the first private project (such as the first lesson of the course), click "Create new private project".
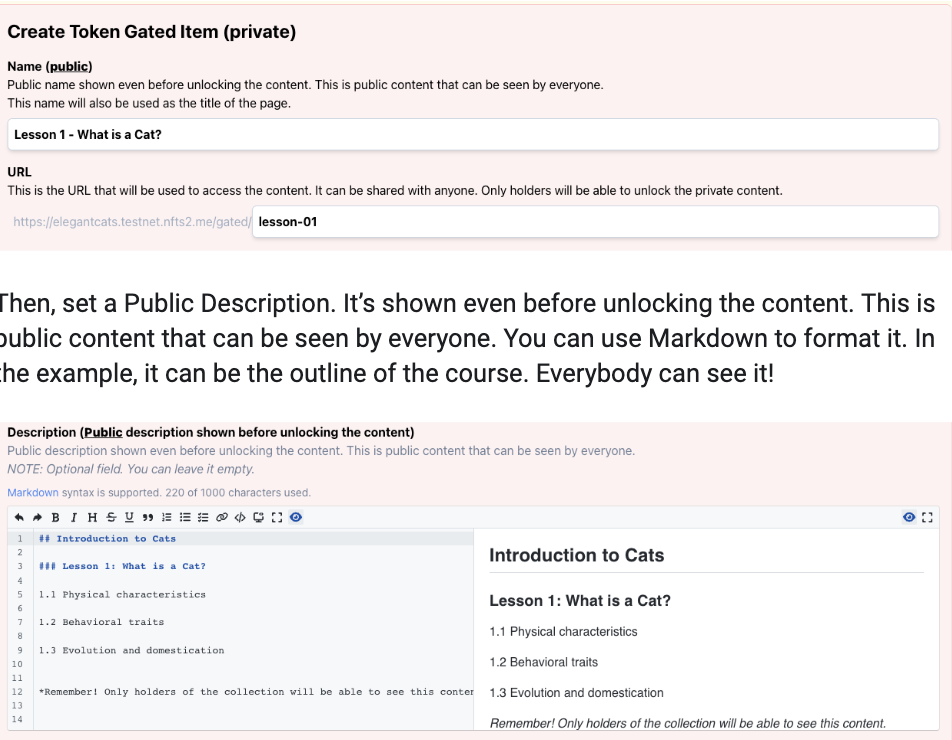
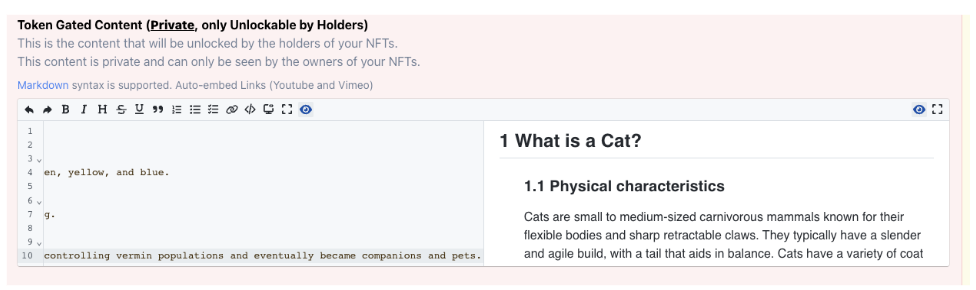
First you need to set the setting name and URL; then, set the public description -- public content that everyone can see, which can be formatted using Markdown, in this case a course syllabus. As follows:
Next comes the creation of private content, which only the NFT holder can unlock, as follows:
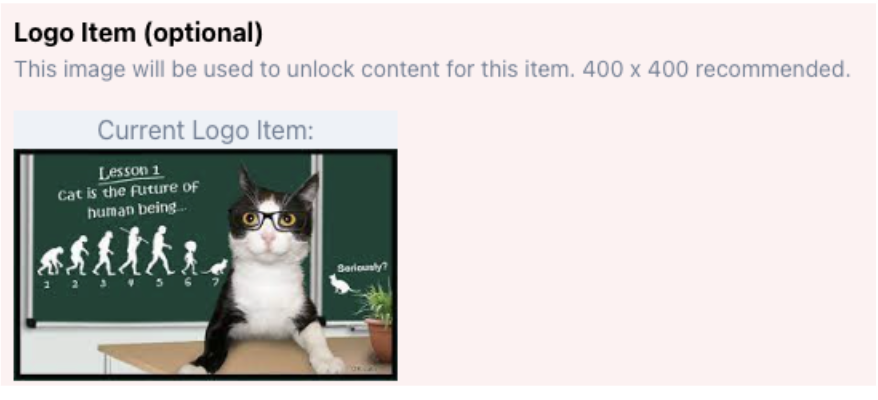
There is an option to upload an image for this project, for future use when sharing on social networks:
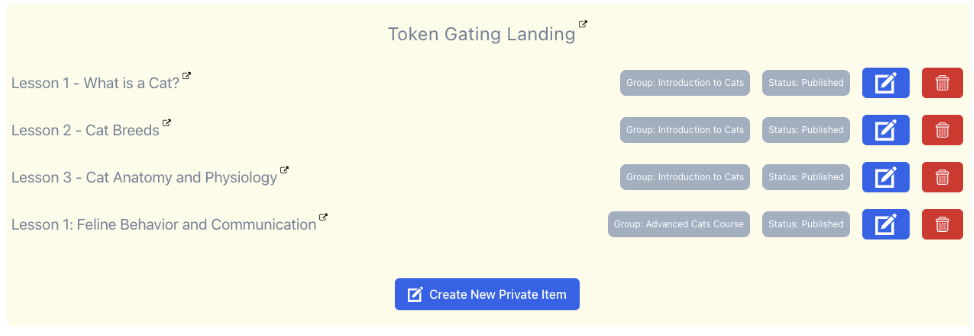
Finally, there is an option to group items into groups. In the case, we group them by "courses" and list them on the home page.
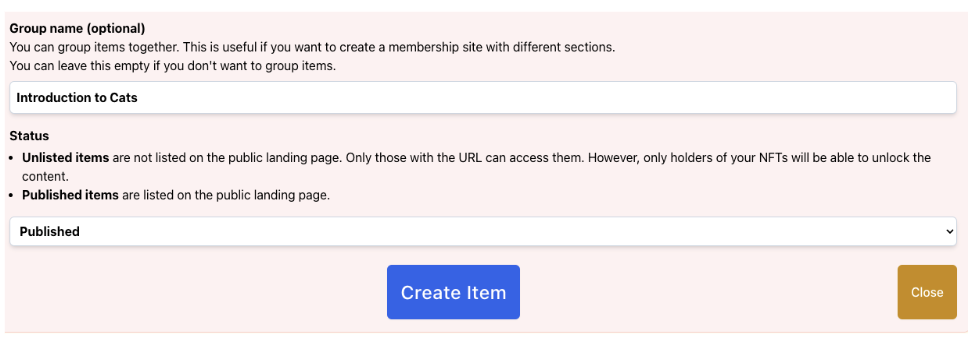
Press "Create Project" to continue and you will see the newly created token gated project, the task is officially complete. Of course, you can also create several more, and the final effect is as follows:
secondary title
GhostNFT (6 tasks, 35 points)
Task 1: Apply for Linea Testnet gNFT for free (5 points)
EnterGhostNFT official website (click), the free claim banner will automatically pop up, and you can directly click to enter the dedicated claim page; select the Linea testnet, connect to the MetaMask wallet, and click directly on Claim. As follows:
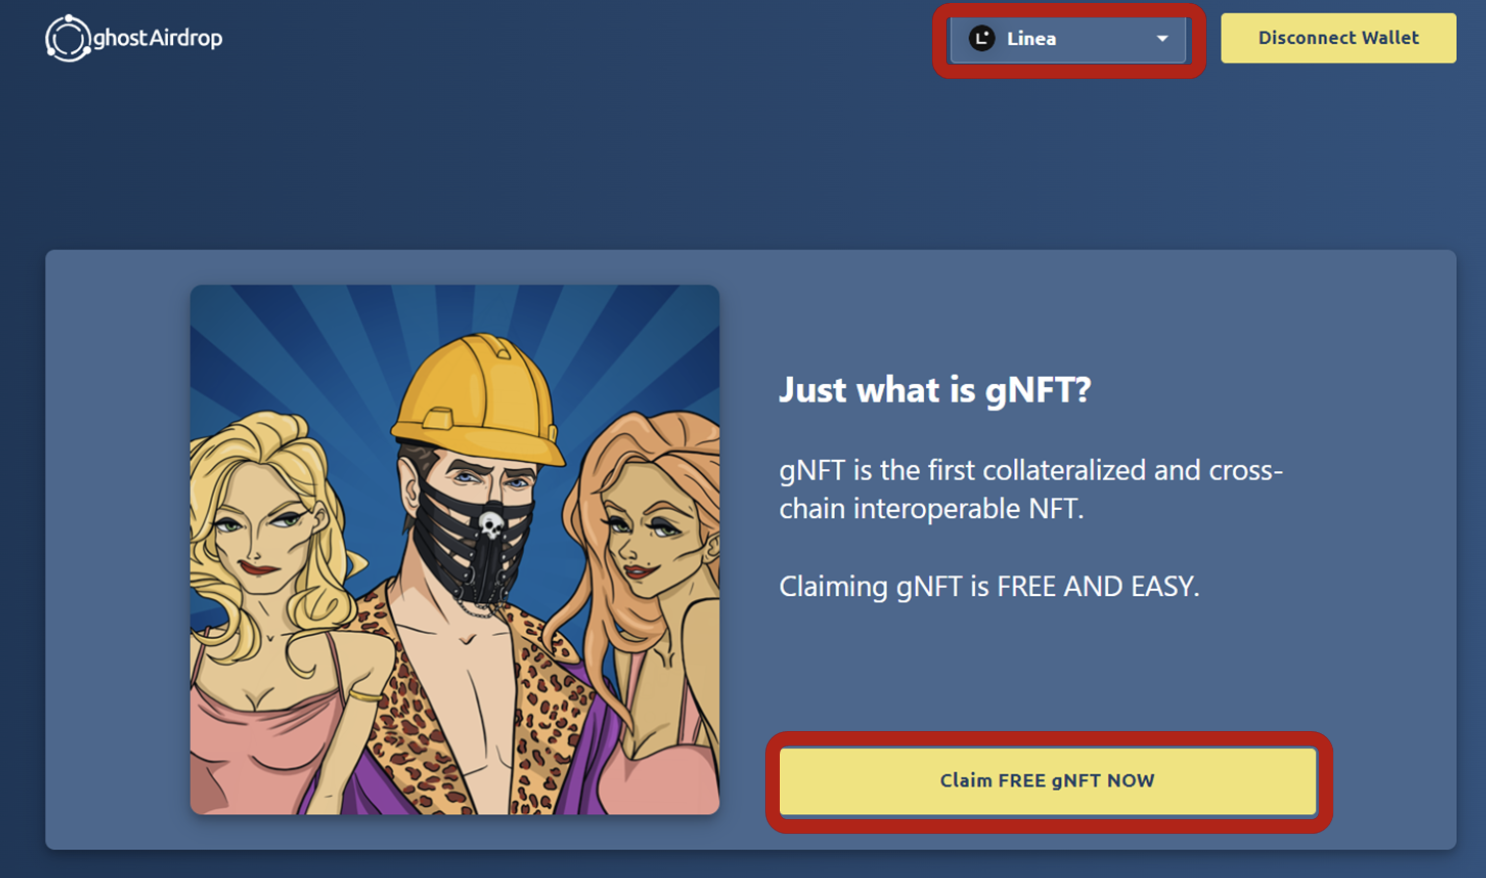
After the claim is complete, the system will be automatically redirected to your personal ghostAirdrop dashboard, where the claimed NFT will also appear.
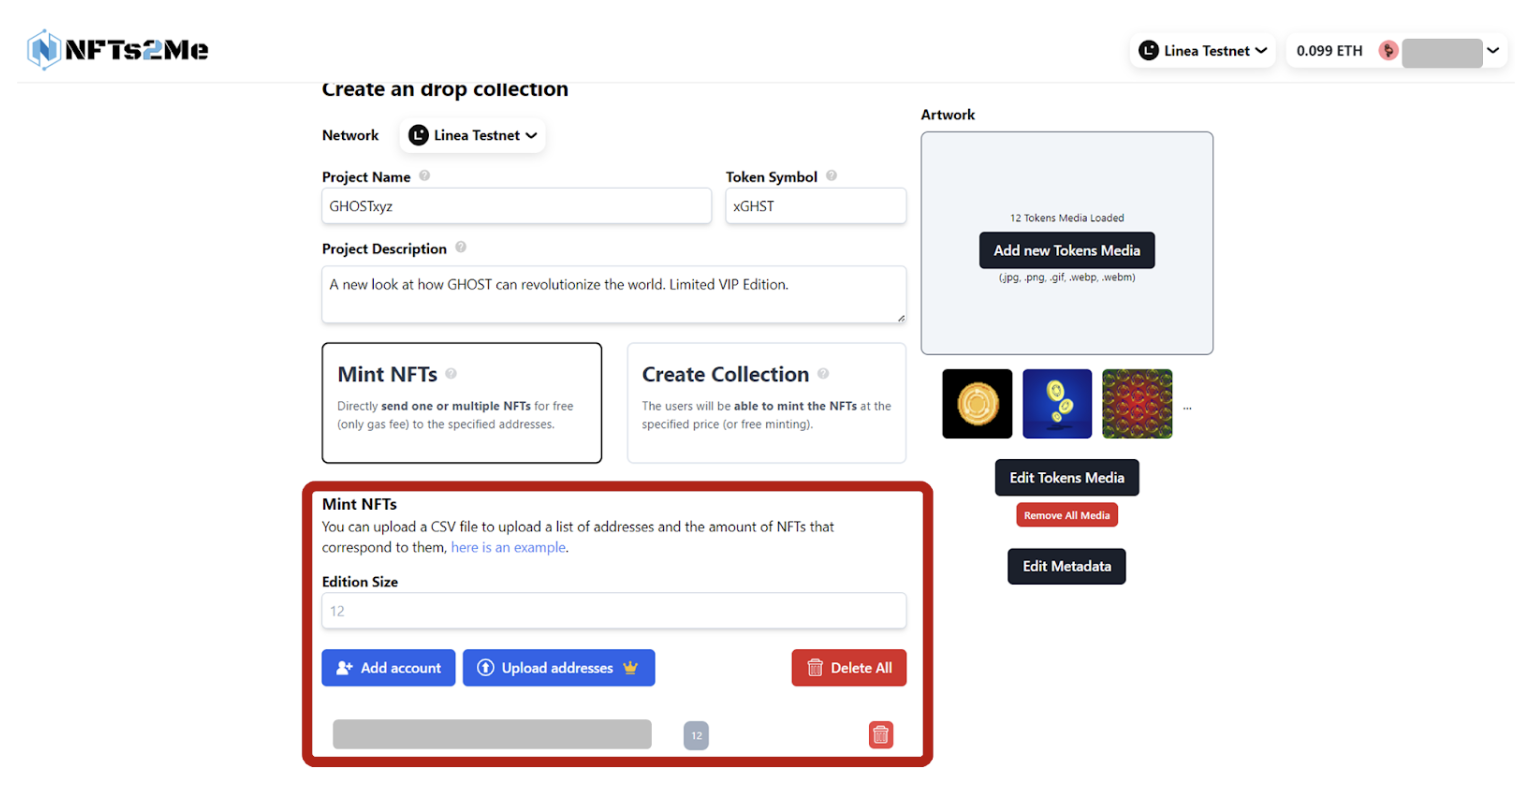
Task 2: Register an ERC 721 NFT collection and scatter at least 0.05 ETH (10 points)
First, we need to create the ERC 721 NFT collection. Revisit the NFT platform from the first missionNFTs 2 Me, click the "Drops" button to create; fill in all relevant information, including project name, token symbol, project description, etc.; upload the work, add metadata, and then connect the wallet; select the "Mint NFT" option, fill in the quantity, ownership address, etc. all relevant information. As follows:
Click the "Submit to Linea Testnet and Mint" button at the bottom and wait for the network confirmation; after completion, copy the NFT contract address to facilitate ghostNFT registration. As follows:
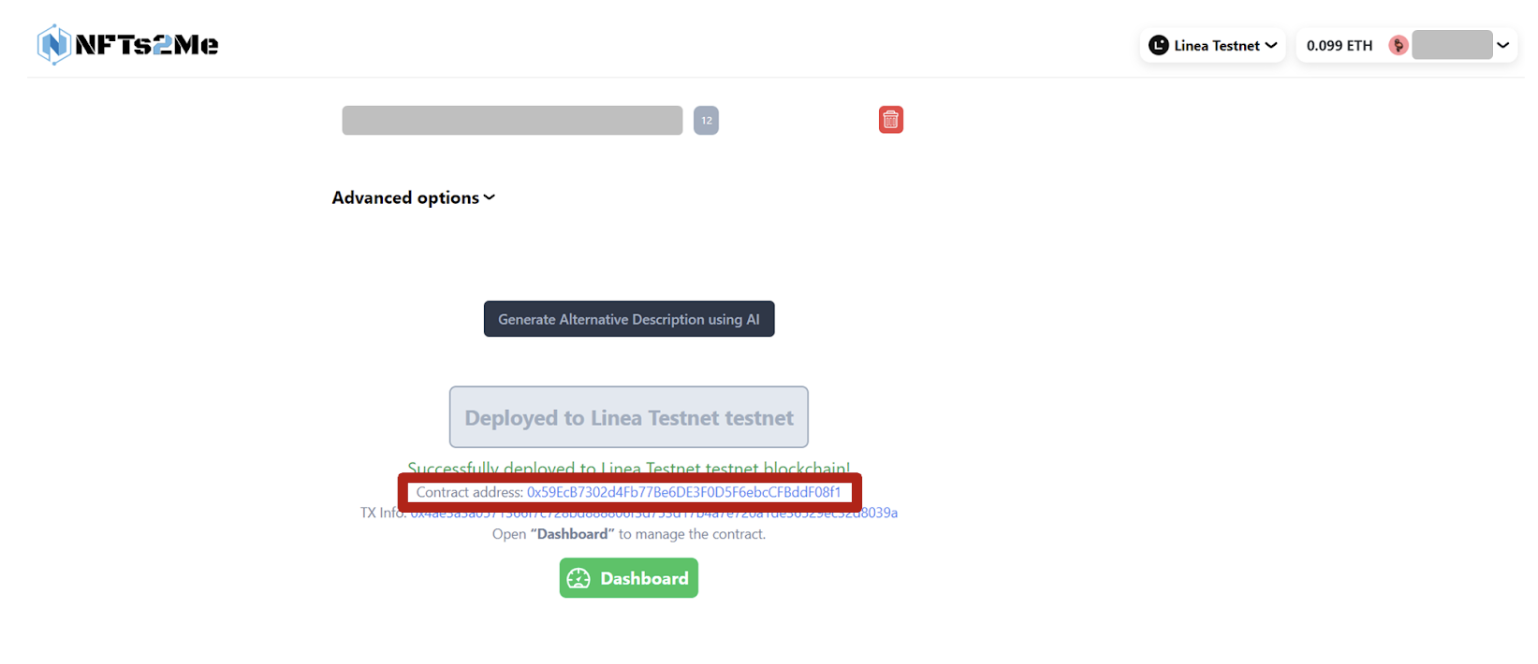
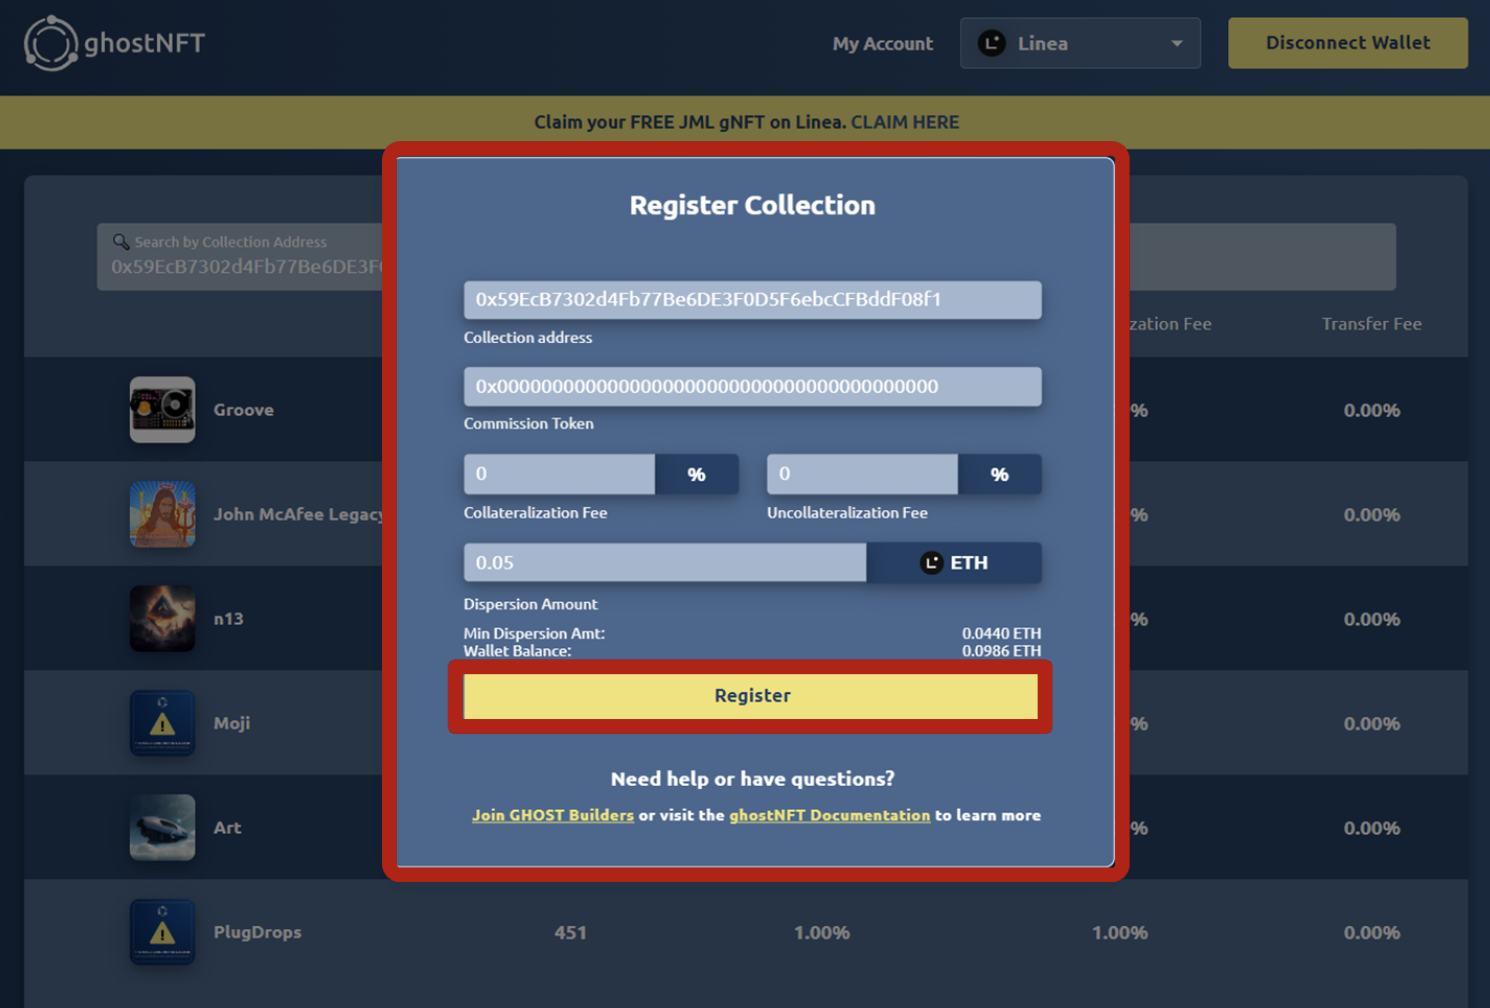
The next step is to officially register your NFT collection on ghostNFT. visit firstghostNFTOfficial website, and make sure to select Linea Testnet.
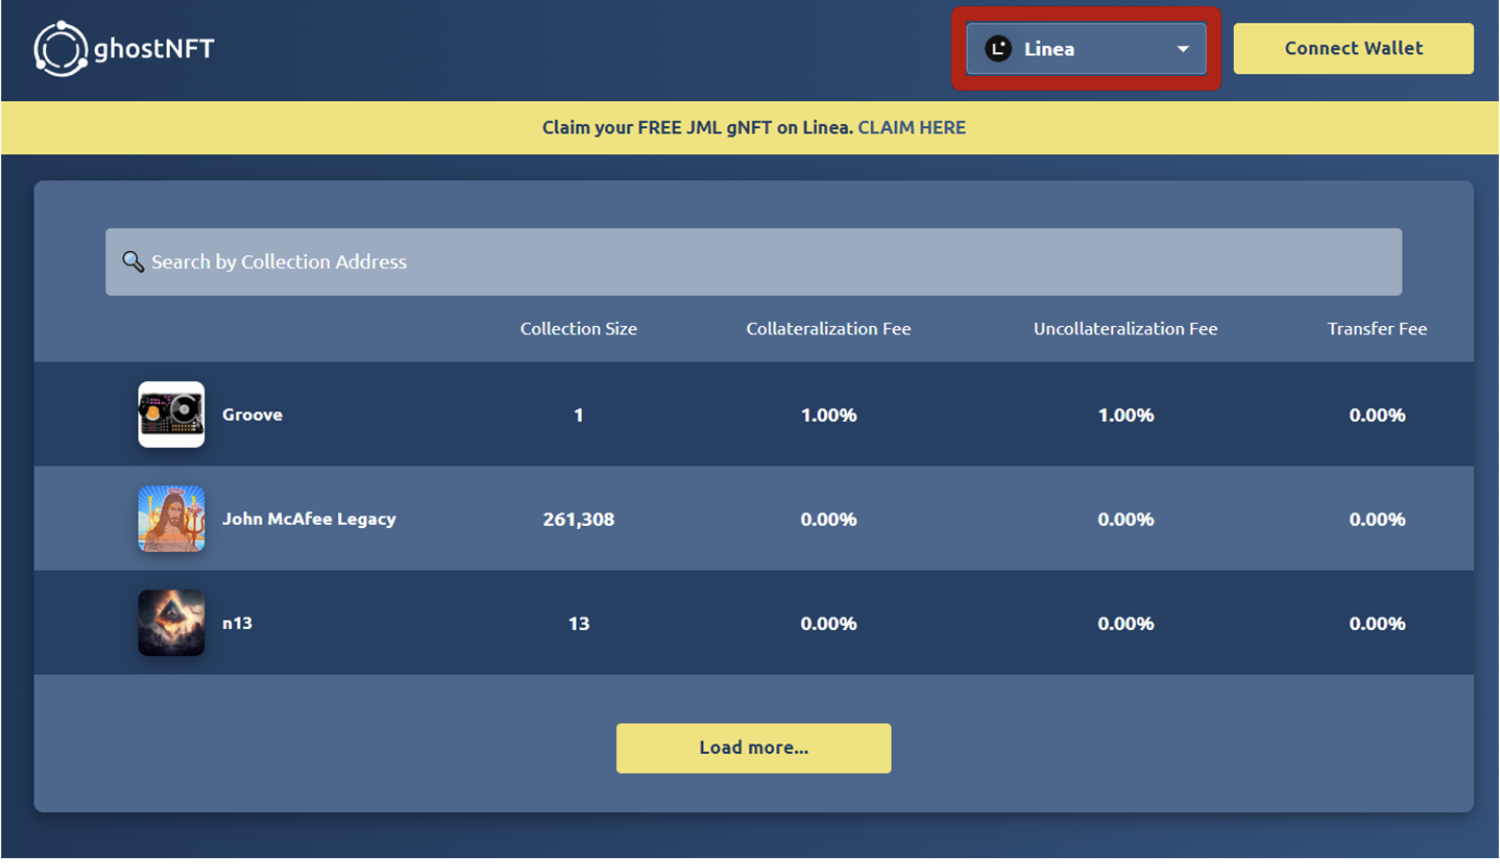
In the search box at the top, enter the NFT contract address copied earlier - since the collection has not been registered, a window will pop up automatically; at this time, you need to connect to the wallet and continue to fill in the required fields, where "Dispersion amount" fills in 0.5, and the following tokens Just select ETH and click the "Register" button at the bottom. As follows:
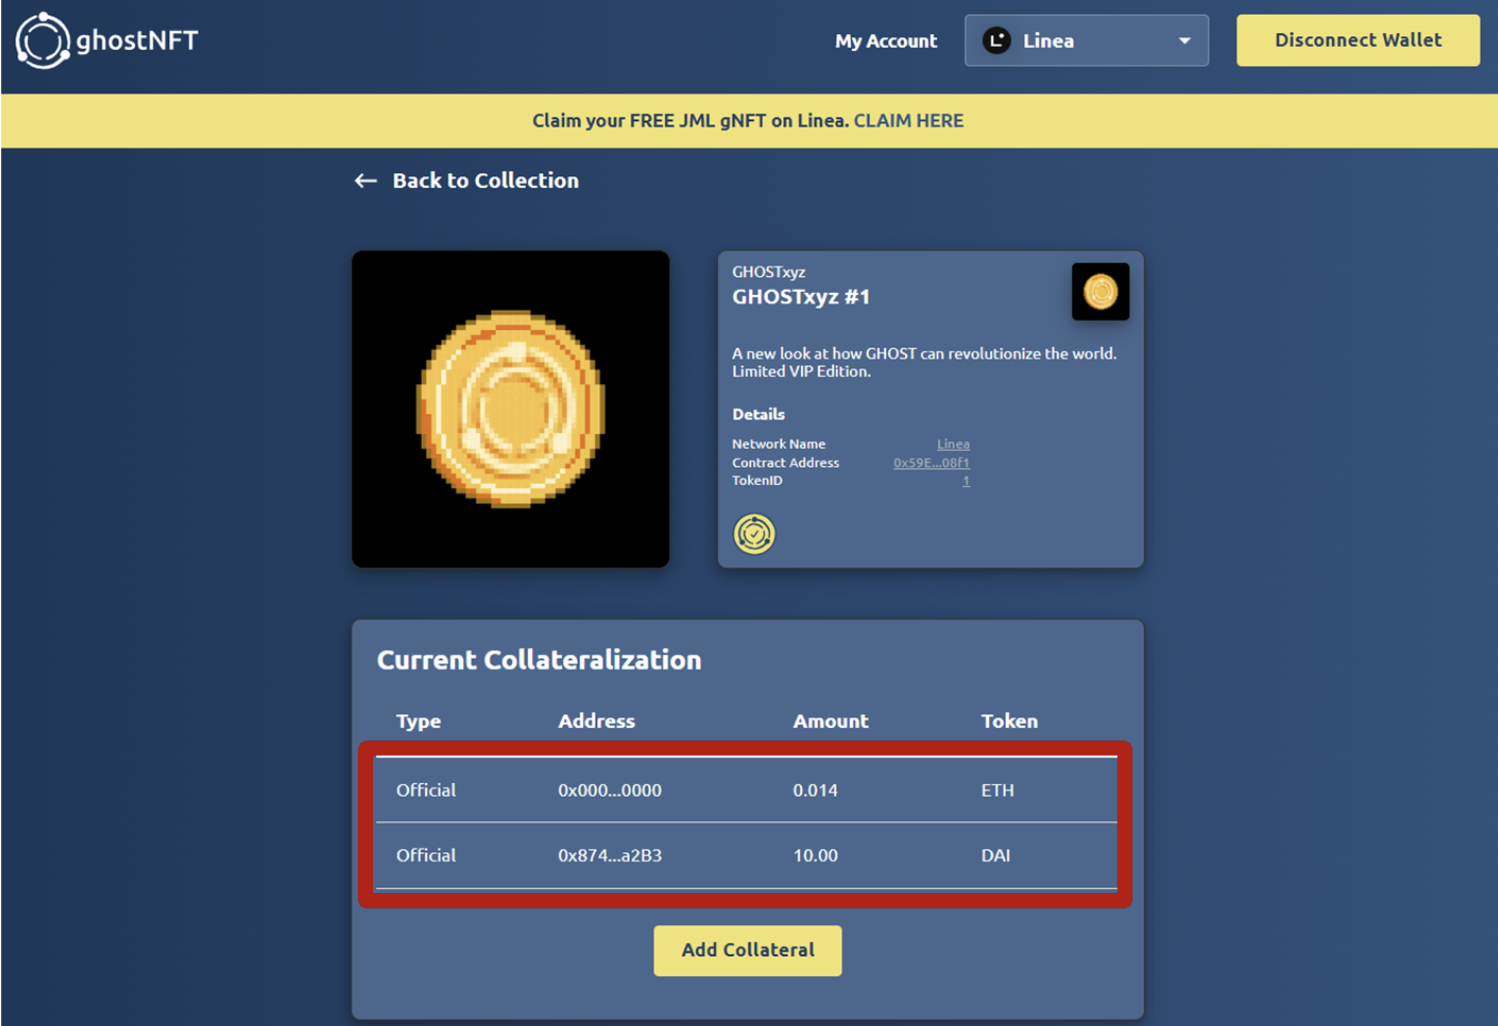
Task 3: Stake your NFT collectibles on ghostNFT (5 points)
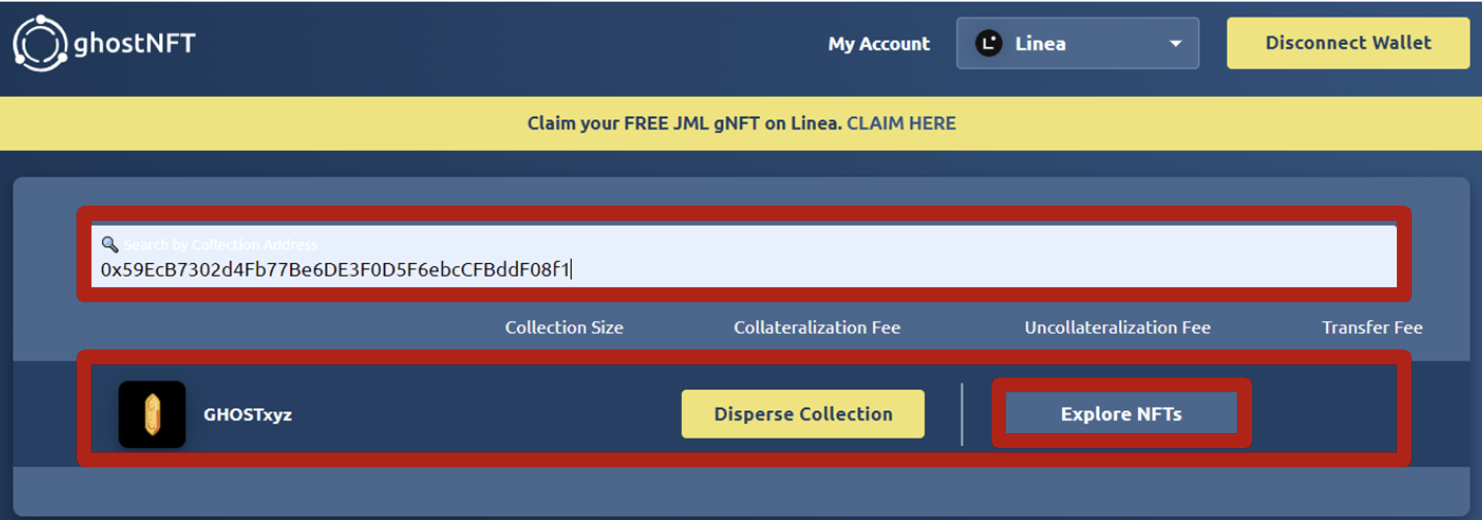
After the NFT is successfully registered, paste its contract address into the search bar and click the "Explore NFT" button, as shown below:
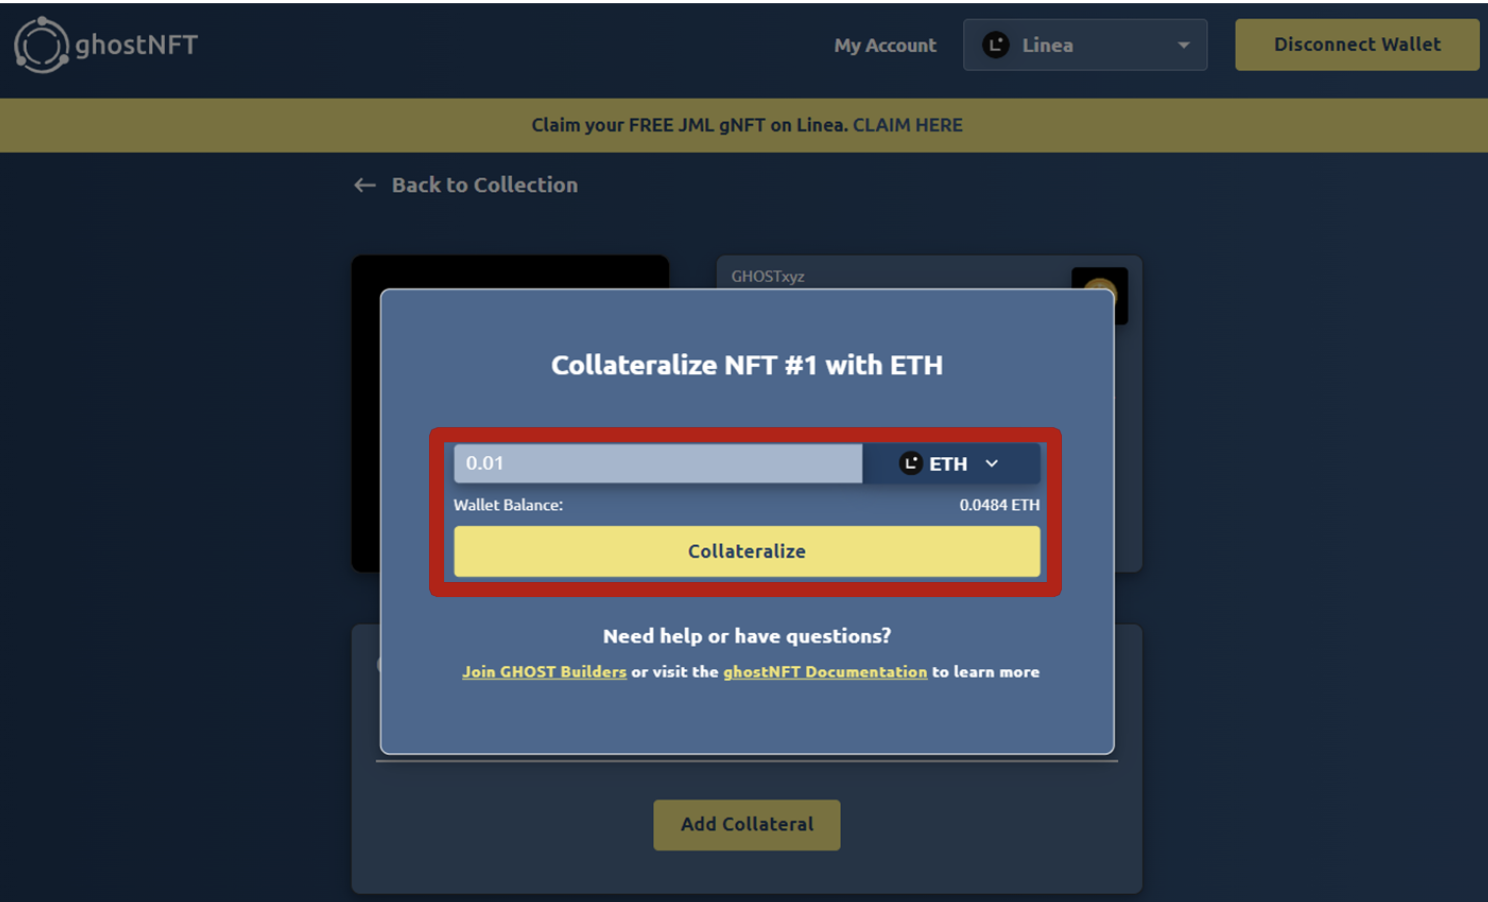
Select any NFT from the collection that appears, and click to view NFT; click the "Add Collateral" button, a pop-up window will appear, select ETH and fill in the amount (0.14 ETH), and click the "Collateralize" mortgage button.
Then select DAI in the pop-up window, fill in the quantity as 10, and proceed to Approve. (Note: DAI can be exchanged on Uniswap of the Linea network).
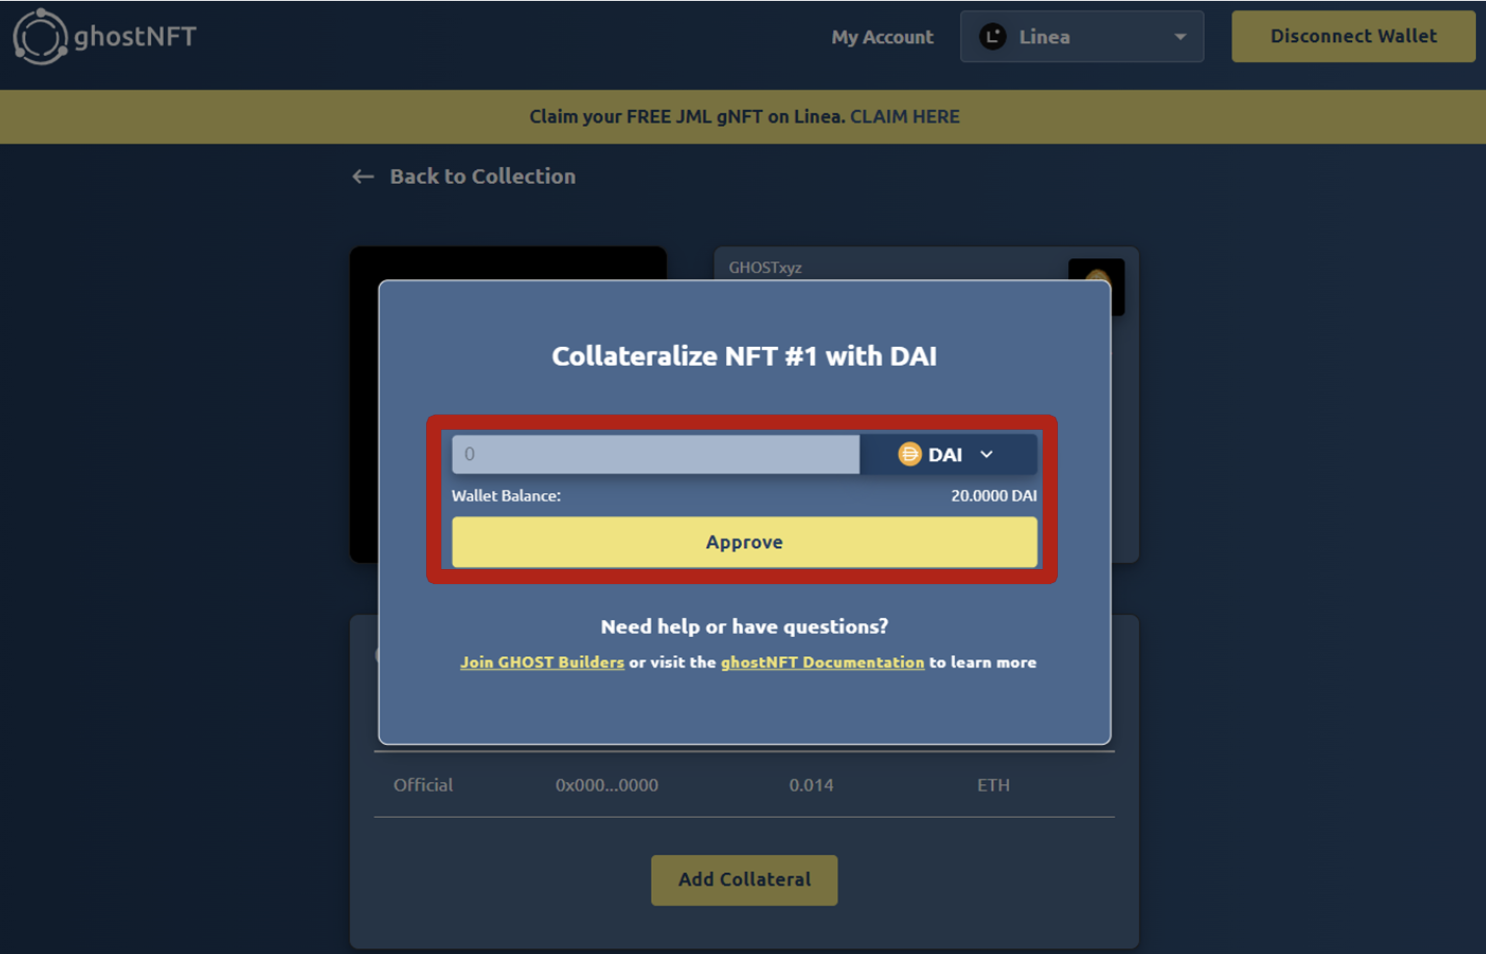
Finally, our gNFT completed the mortgage, and the floor price was set at 0.014 ETH and 10 DAI. As follows:
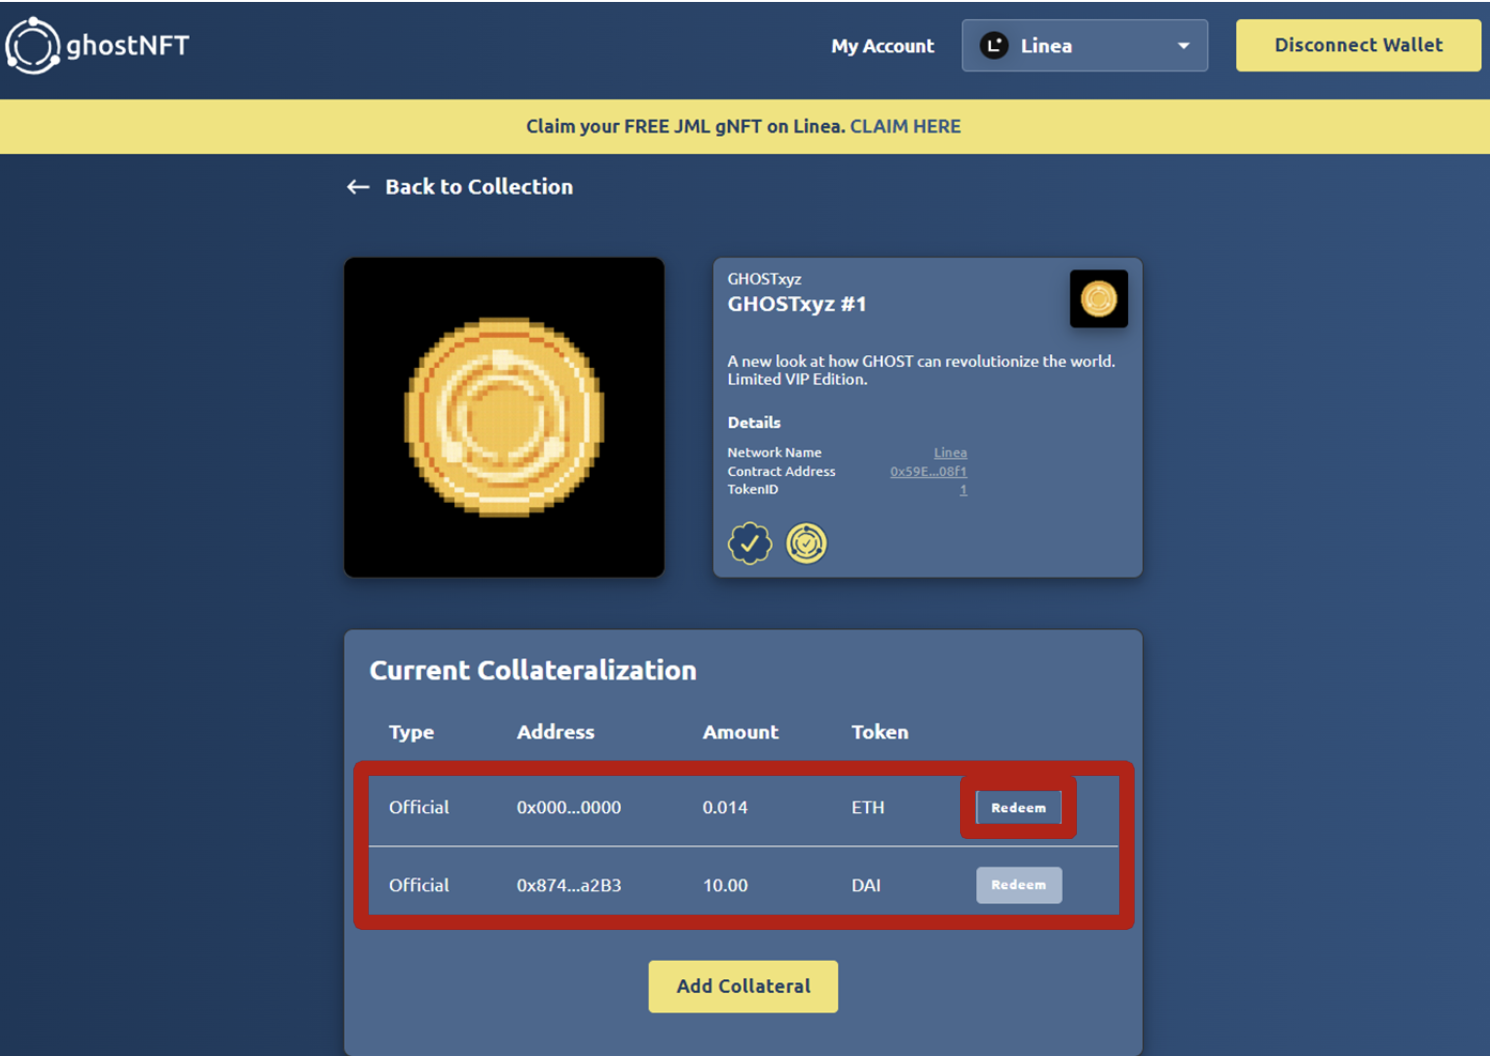
Task 4: Redeem collateral from NFT via ghostNFT (5 points)
After finding the gNFT, click the "Redeem" button to redeem the ETH and DAI collateral in turn.
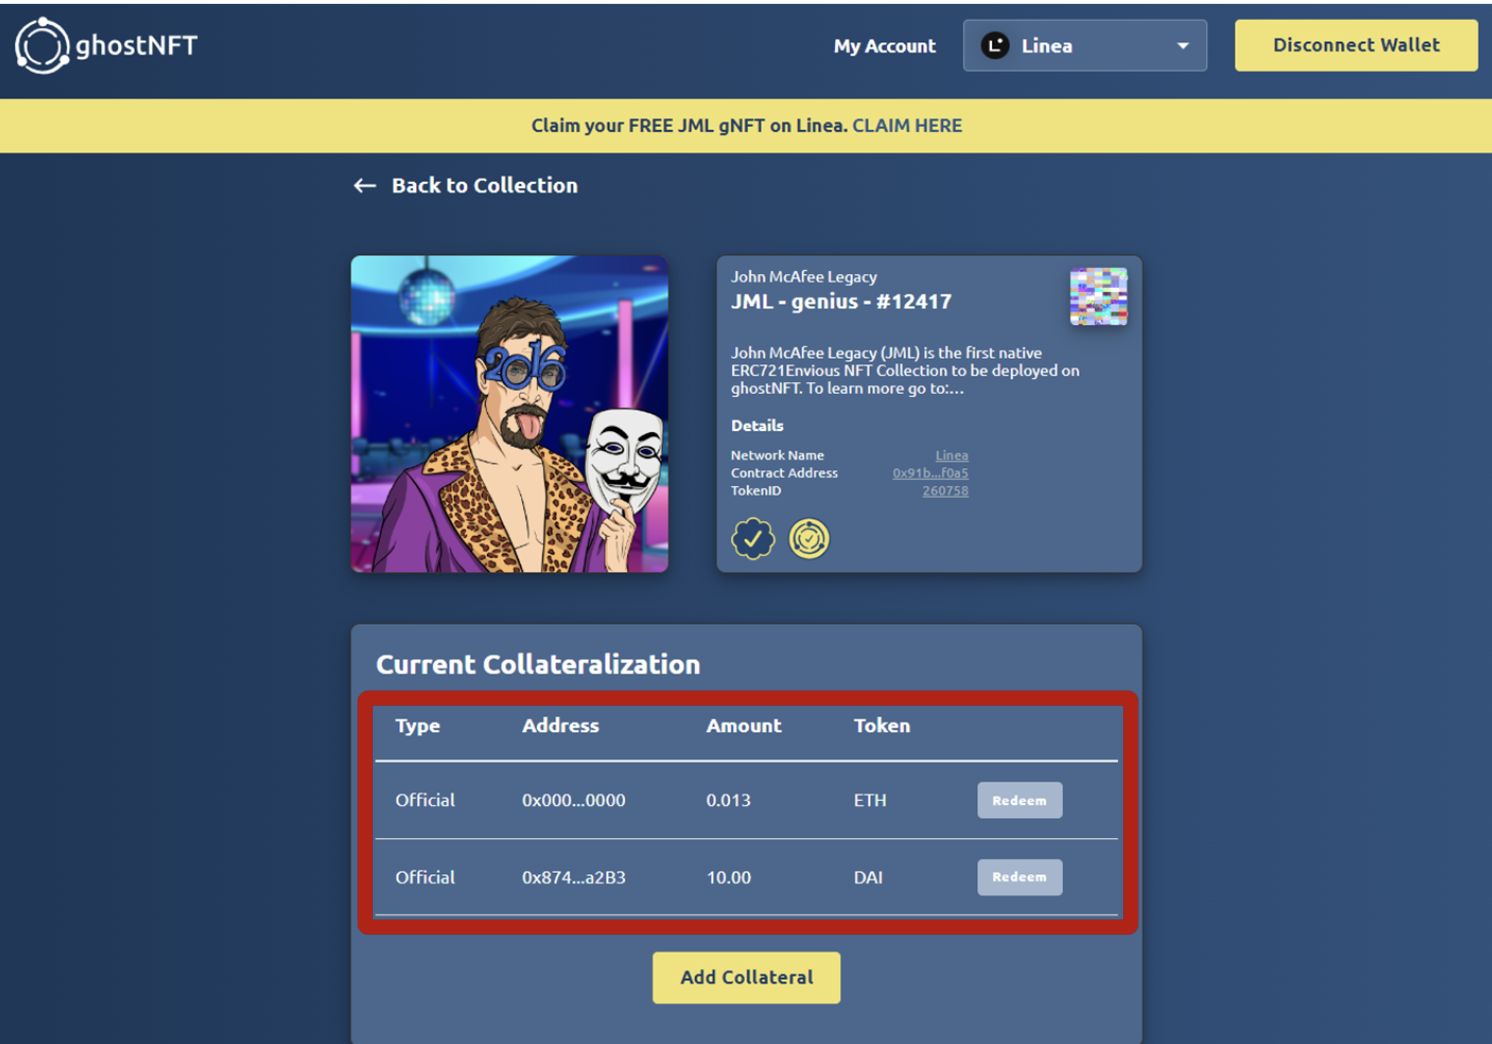
Task 5: GhostNFT - Add collateral to the GHOST NFT series (5 points)
Visit the Linea testnetghostAirdrop , click the "NFT Profile" button to enter the ghostNFT configuration file. As follows:
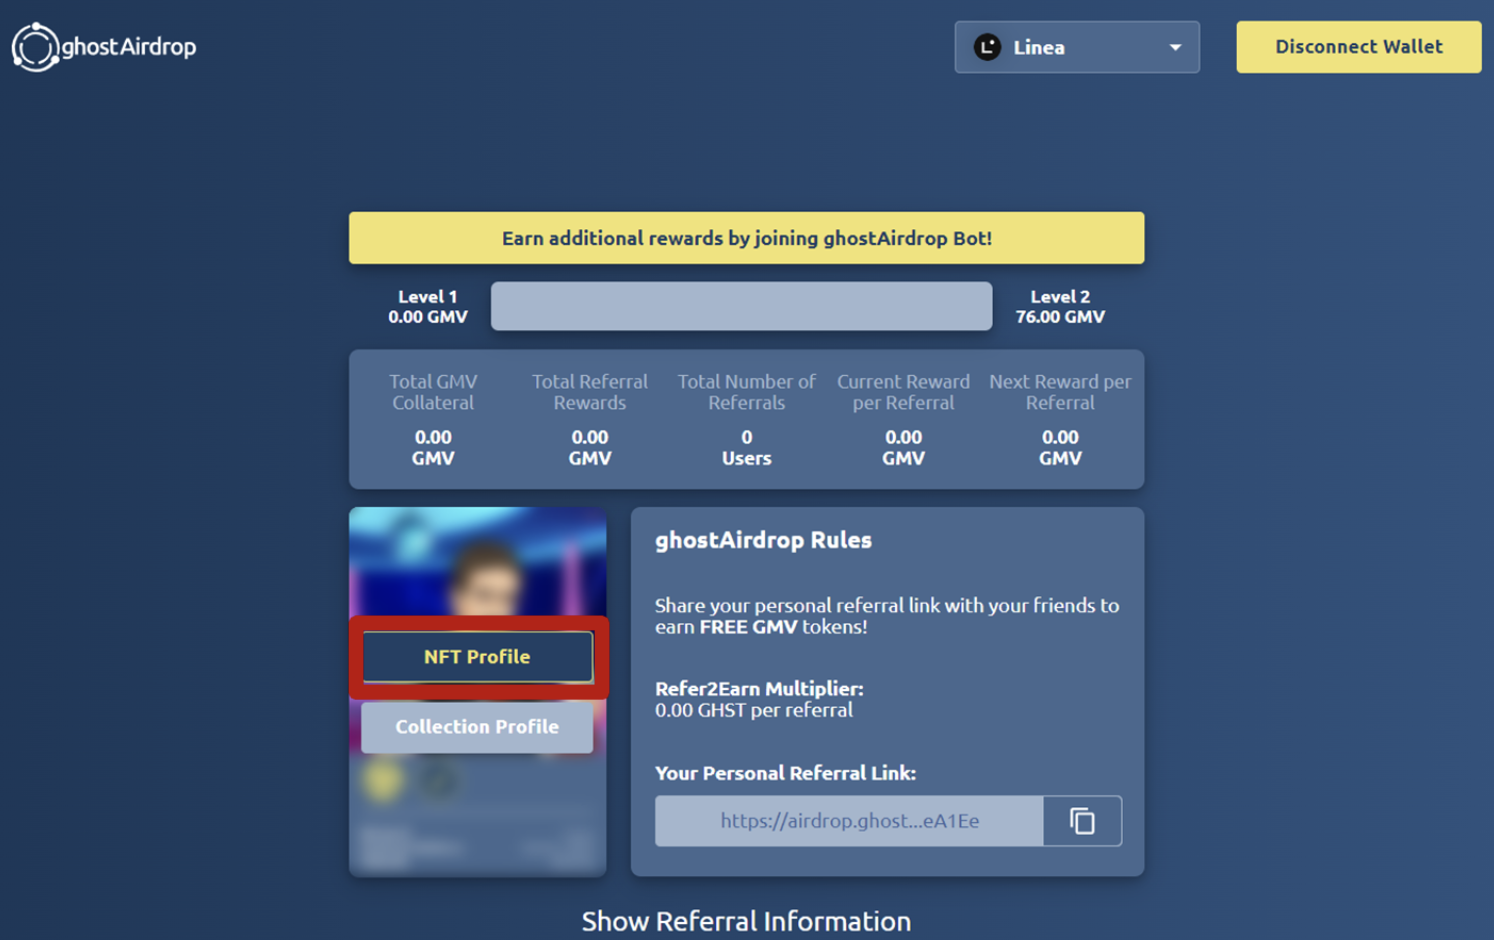
Same as the previous method, click the "Add Collateral" button, a pop-up window will appear, and add ETH and DAI as collateral in turn.
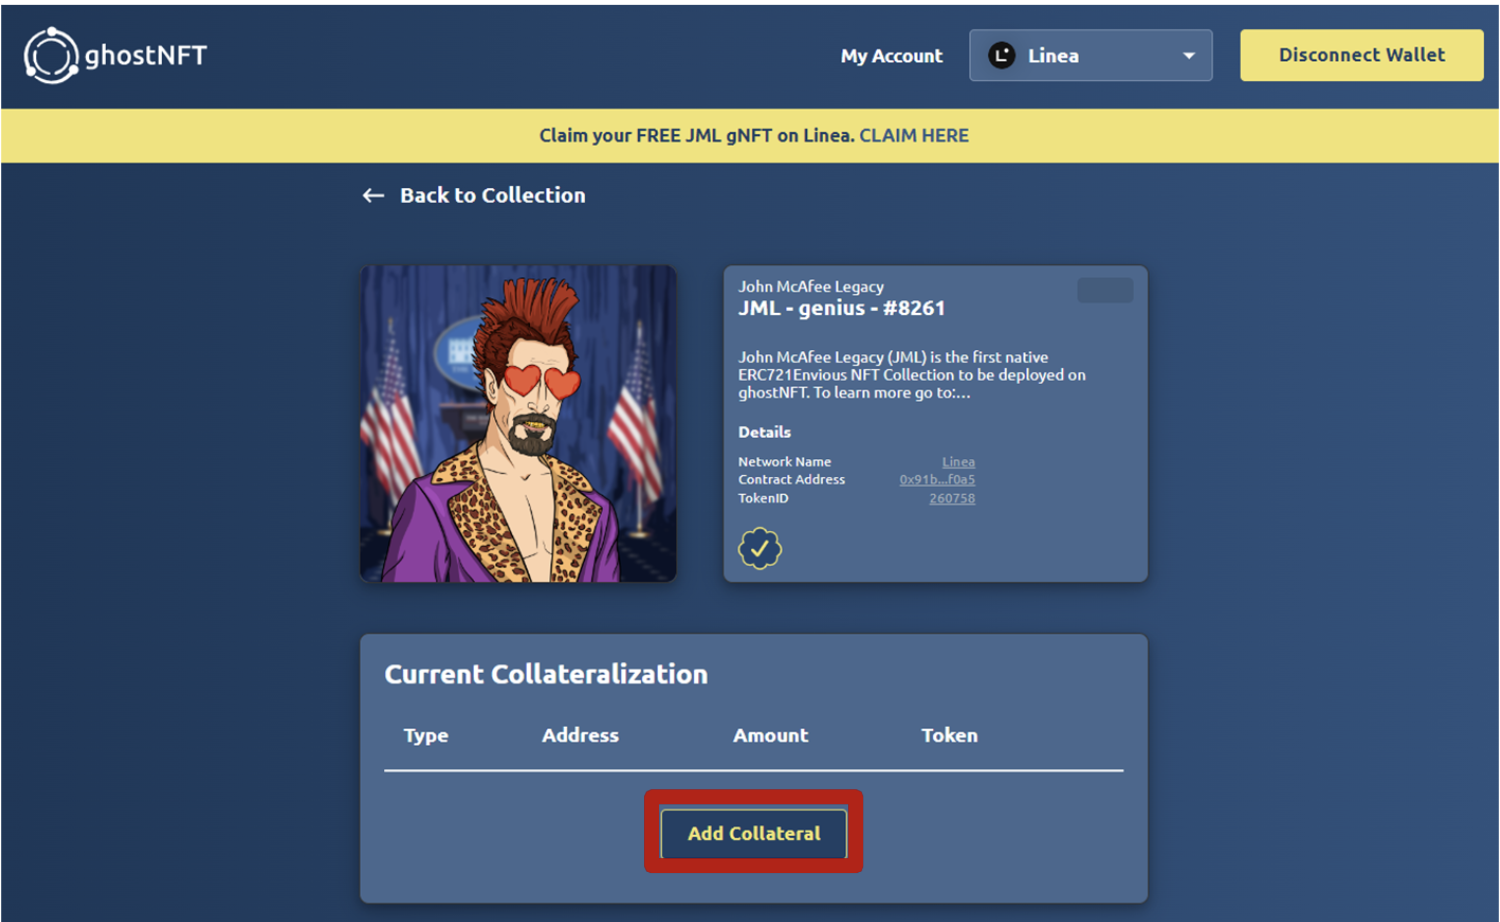
Ultimately, the floor price for this NFT was set at 0.013 ETH and 10 DAI as follows:
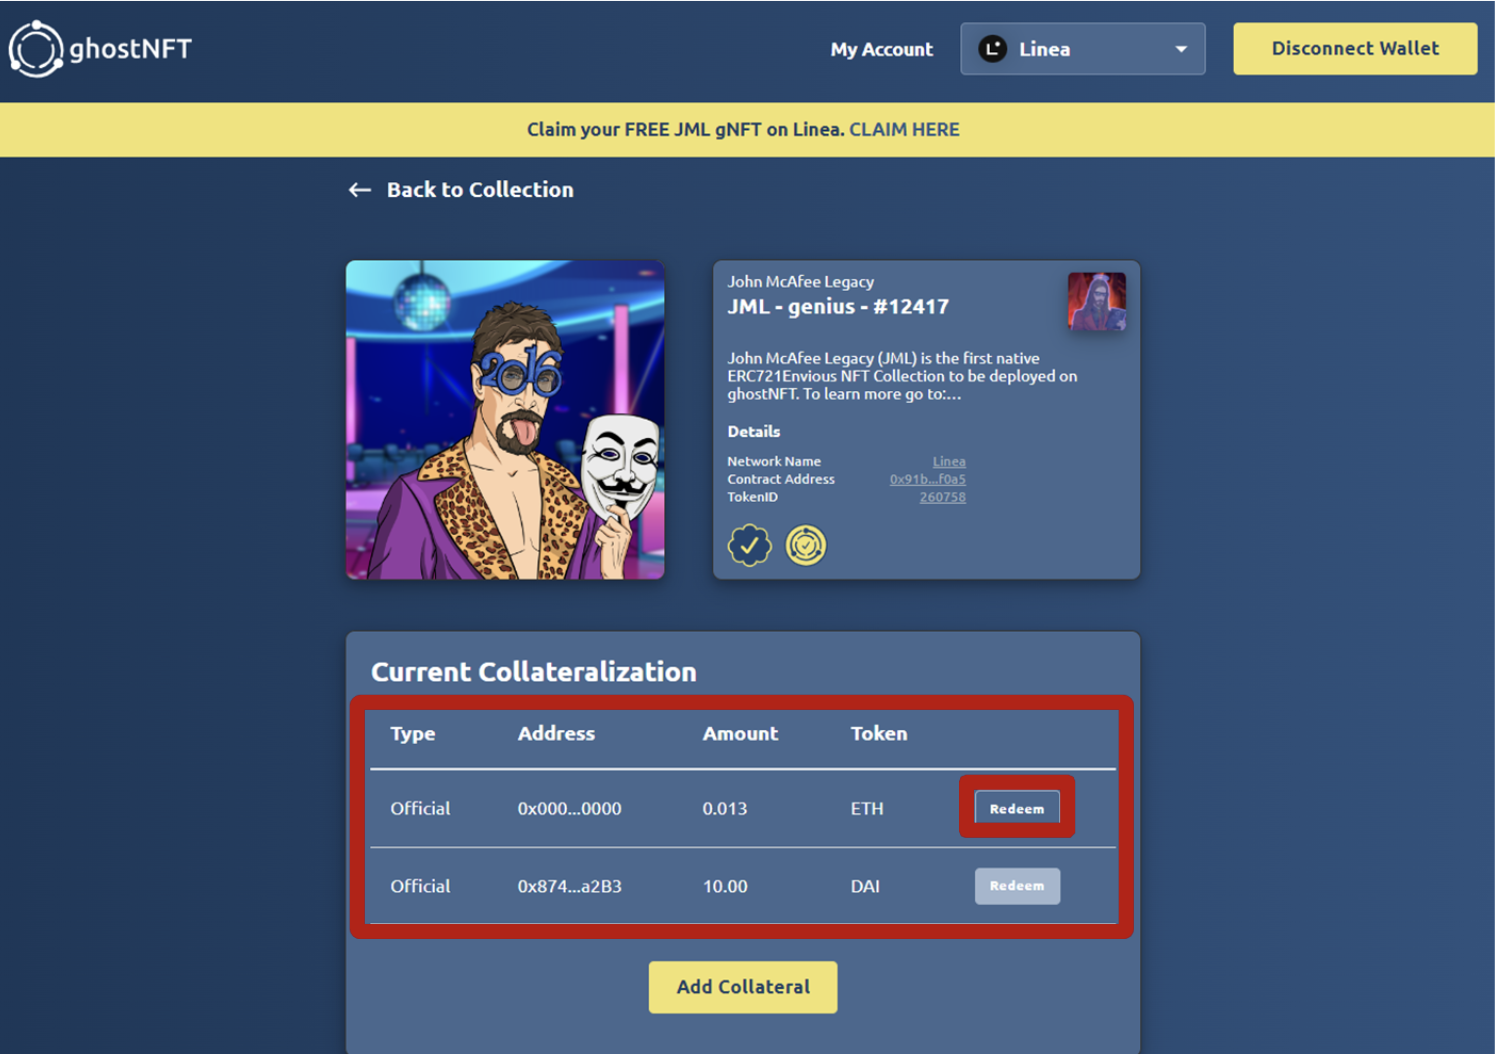
Task 6: Redeem collateral from the GHOST NFT series (5 points)
Find the gNFT, click the "Redeem" button, and redeem the ETH and DAI collateral in turn, as follows:
secondary title
Bilinear (5 tasks, 28 points)
Open
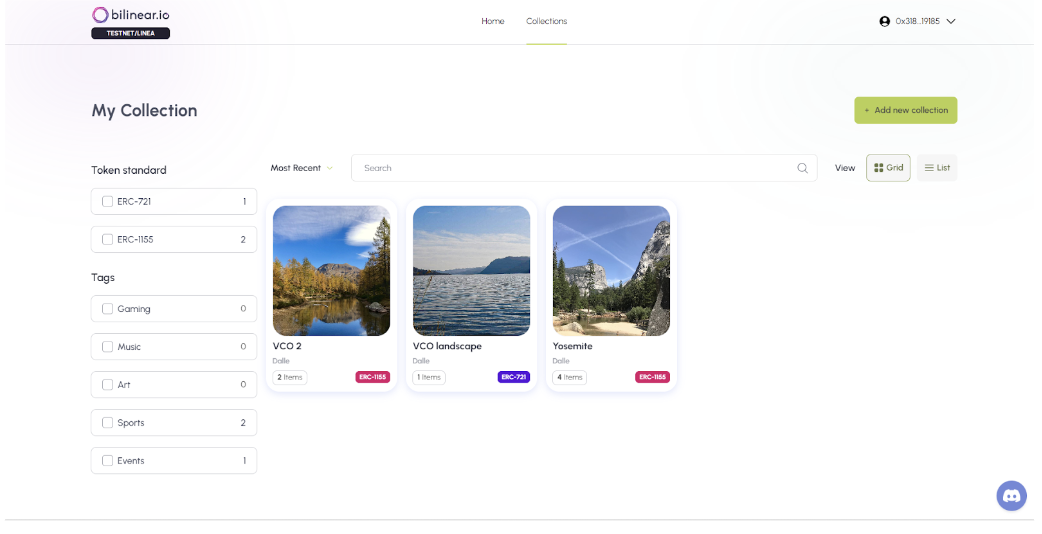
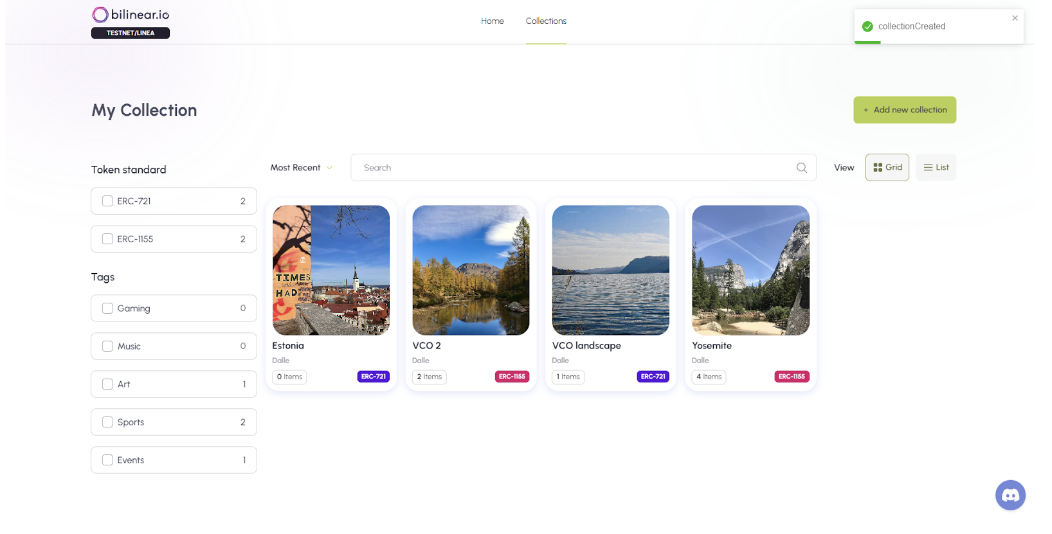
OpenBilinear official websiteHome page, connect MetaMask wallet address, sign authorization and confirm transaction. Once logged in, click on the profile icon in the upper right corner of the homepage, click to open the "My Collection" page; click the "Add new Collection" button.
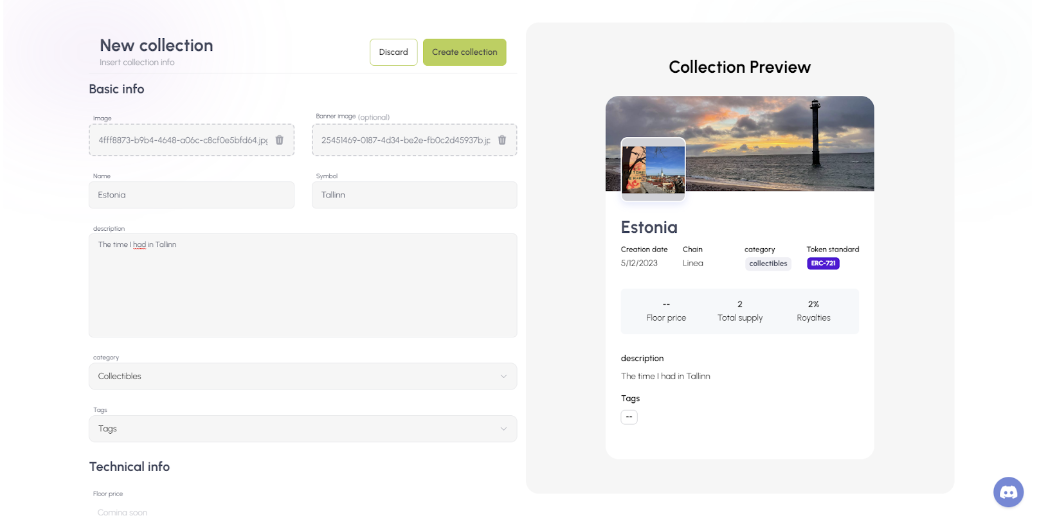
Upload the collection image and cover art on the page, fill in all fields and decide which token standard to use (ERC-721 or ERC-1155), supply and royalty amount. After filling all the fields, click the "Creat Collection" button to create a new collection.
Confirm the transaction in the MetaMask popup; once minted, the relic can be seen on My Collection.
Open
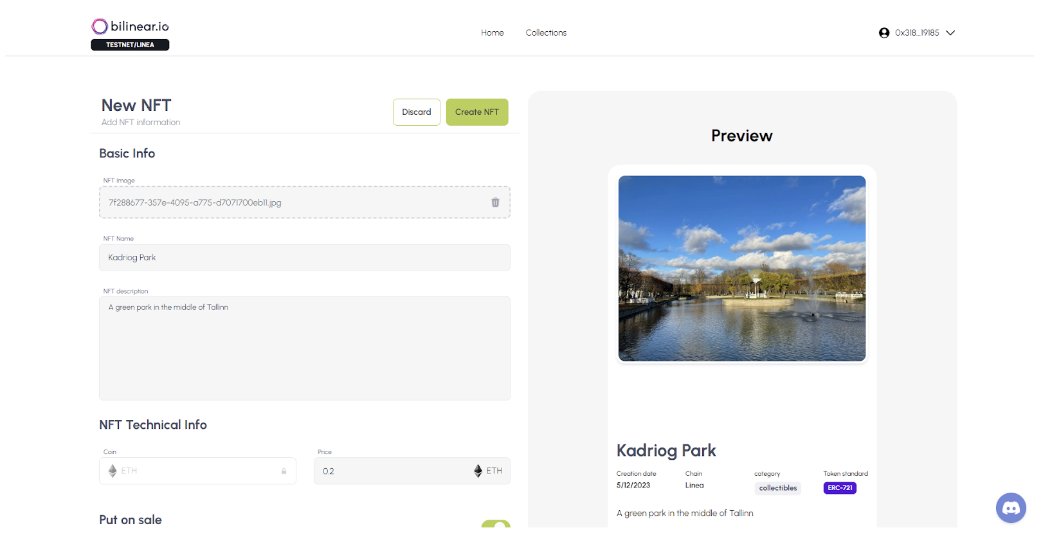
OpenBilinear official websiteHome page, connect MetaMask wallet address, sign authorization and confirm transaction. After logging in, click the profile icon in the upper right corner of the homepage, click to open the "My Collection" page, and you can see all the minted collections. Click on the collection created in the previous task to enter the collection details page, and click "Add New NFT" in the upper right corner of the page to start casting. As follows:
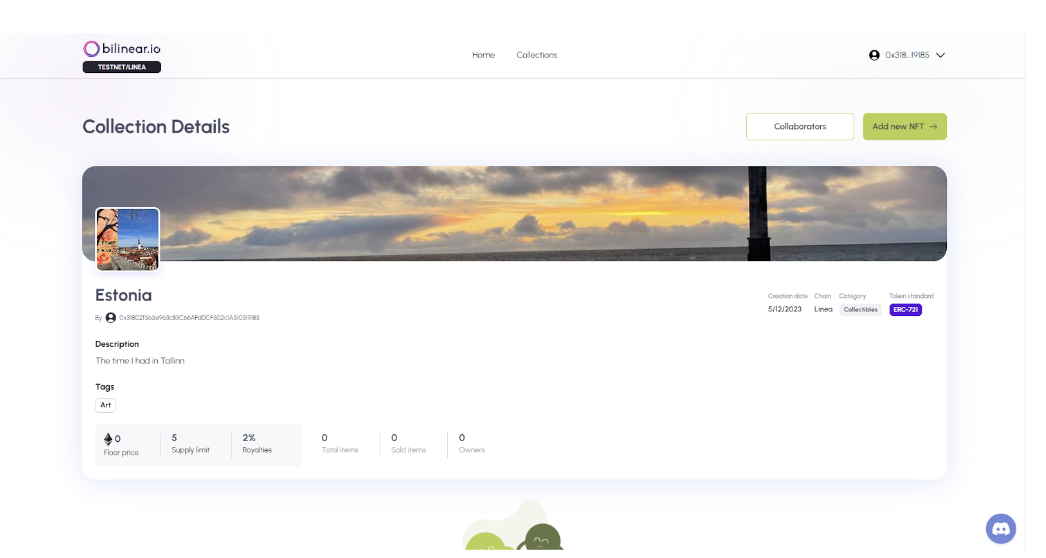
On the NFT creation page, upload an image, fill in all required fields and set a price, click "Creat NFT", and then wait for the MetaMask pop-up window to confirm the transaction. After the NFT is minted, you can see the NFT just minted on the Collection details page.
Open
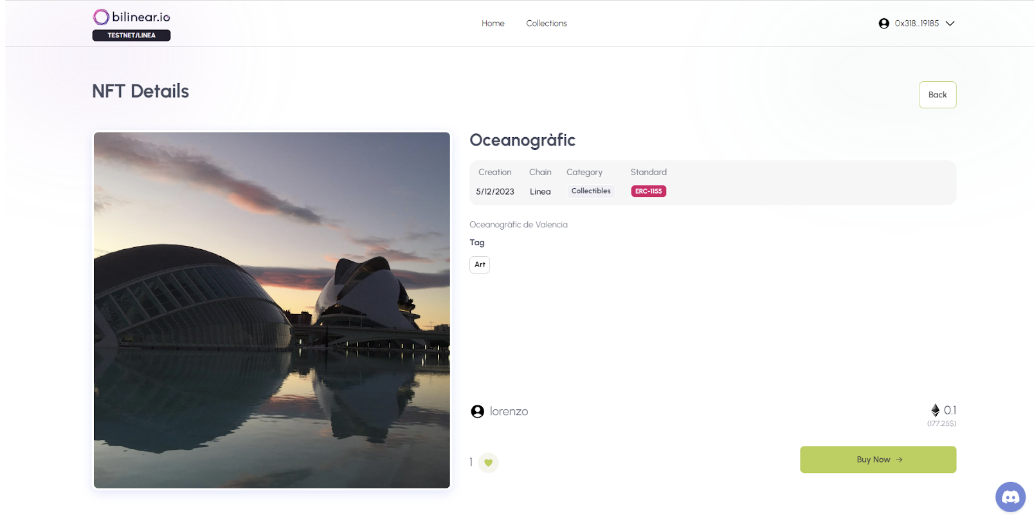
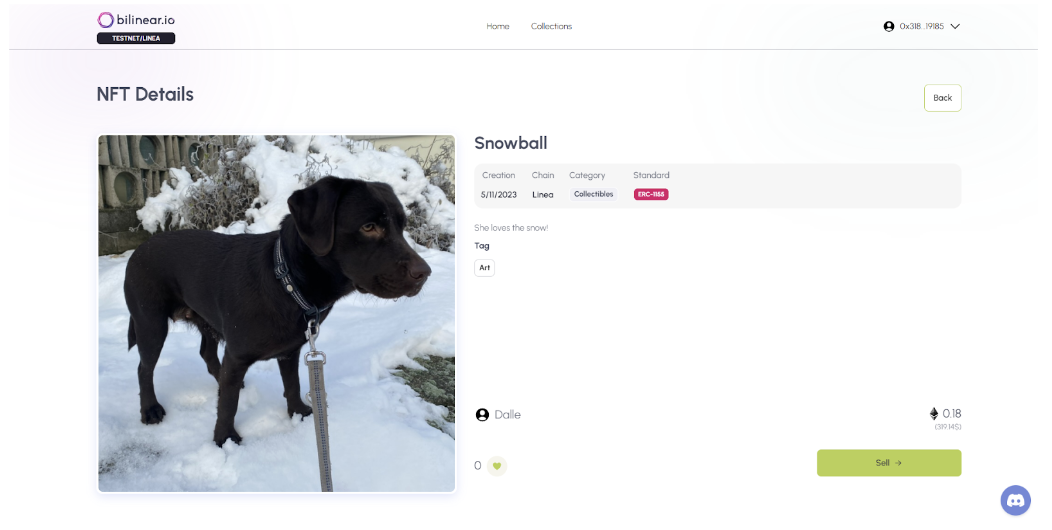
OpenBilinear official websiteHome page, connect MetaMask wallet address, sign authorization and confirm transaction. Click "View All" on the home page to view the page containing all NFT collections; select an NFT collection, and then select an NFT you like after entering to enter the details page; click "BUY NOW" (buy now), pay the fee and Gas can complete the task (same as the Opensea purchase process). As follows:
Open
OpenBilinear official websiteHome page, connect MetaMask wallet address, sign authorization and confirm transaction. Click "Personal Information" in the upper right corner to view the NFT collections you already own, select one of them and click to enter the details page; click "Sell", set the price, and sign the transaction on the chain to complete the sale (same as Opensea purchase process). As follows:
Open
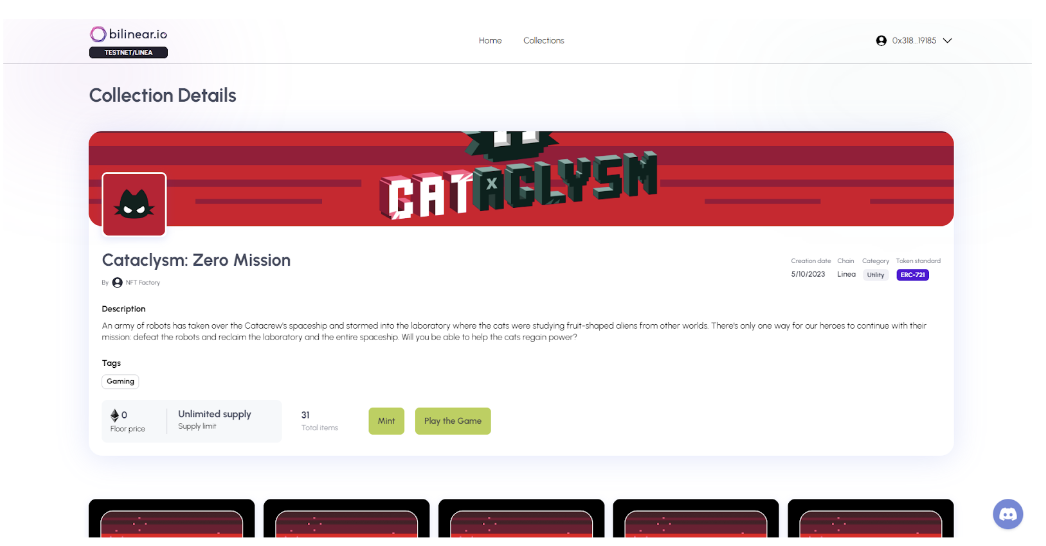
OpenBilinear official websiteHome page, connect MetaMask wallet address, sign authorization and confirm transaction. Click "View All" on the homepage to view the page containing all NFT collections; directly enter in the search box: Cataclysm: Zero Mission - this is the game NFT launched by the Italian web3 company KNOBS; directly on the NFT collection details page, click "Mint" button, complete the transaction on the chain, and you can mint a game NFT. As follows:
secondary title
Zonic (4 tasks, 18 points)
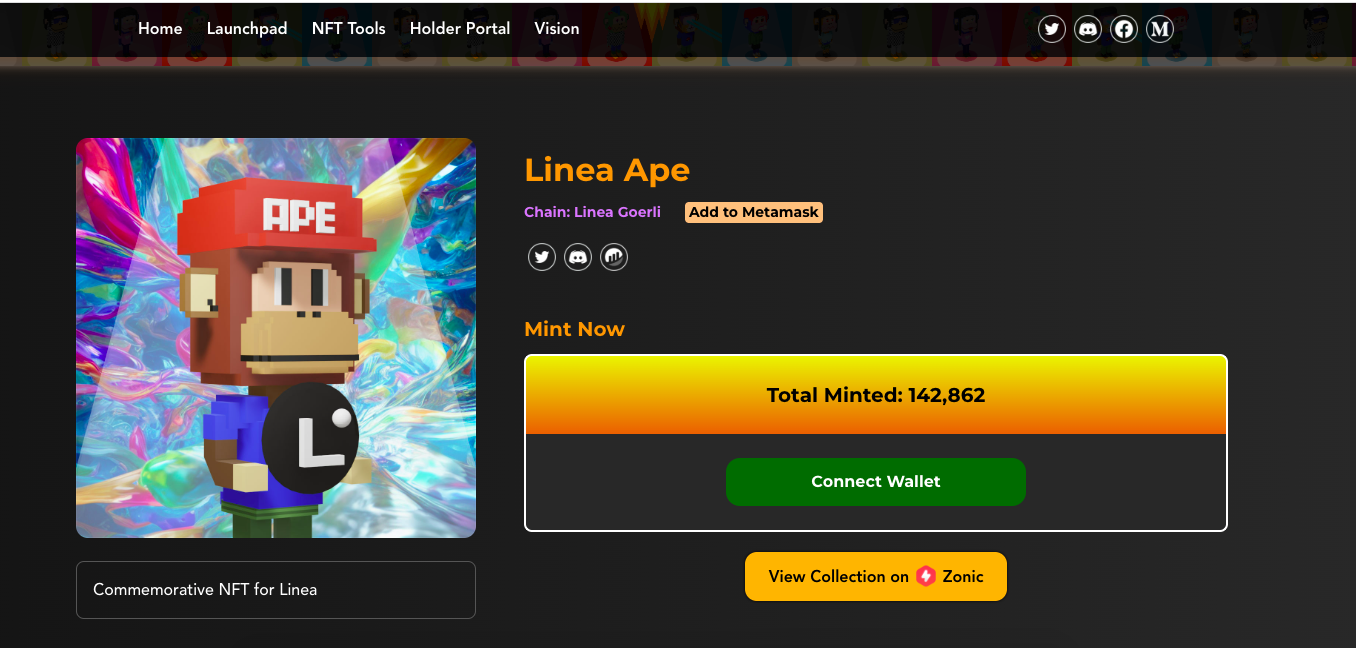
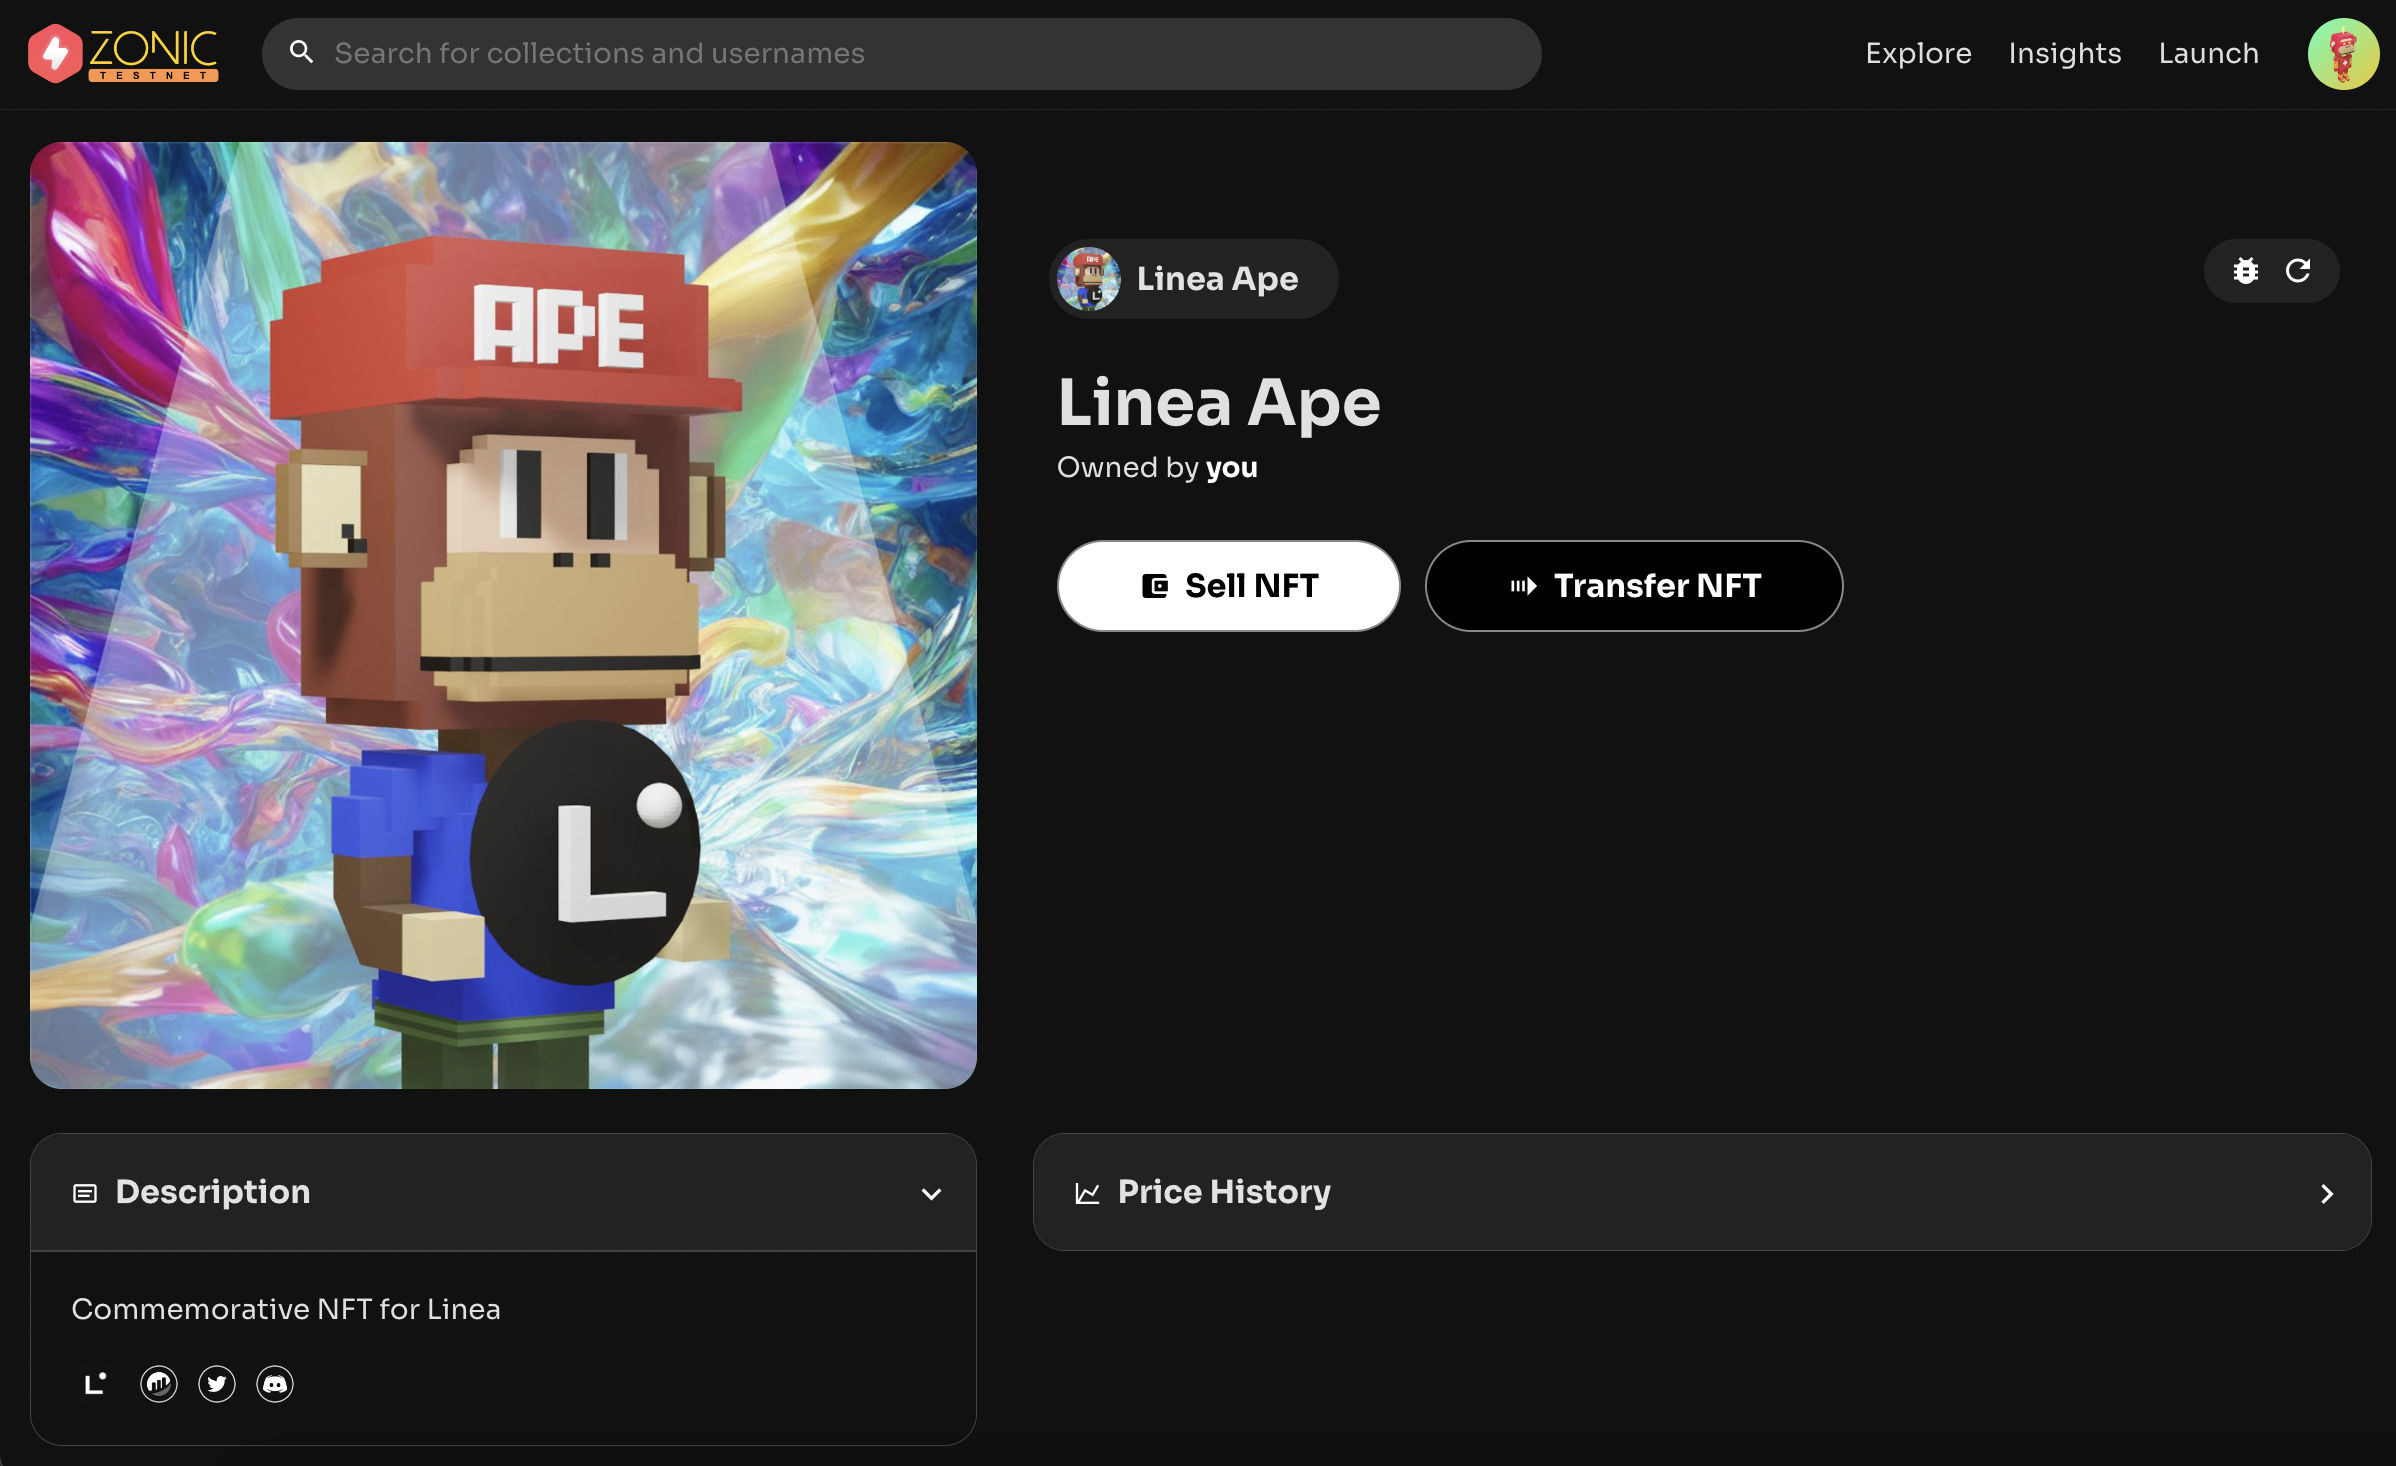
Task 1: Mint the Linea Ape Zonic NFT collection on Apetimism (5 points)
click to enterApetimism official website, connect to the MetaMask wallet to authorize login; directly select Mint to complete the minting, the minting fee is 0, and the GAS fee on the chain can be paid. As follows:
Open
OpenZonic official website, connect to the wallet to authorize login, open "My NFT" to view the NFT you own on the Linea test network; select the Linea Ape Zonic NFT of our previous task Mint, click "Sell NFT" and enter the price and expiration time, click " List Item”, wait for the transaction confirmation on the chain to complete the pending order. As follows:

Open
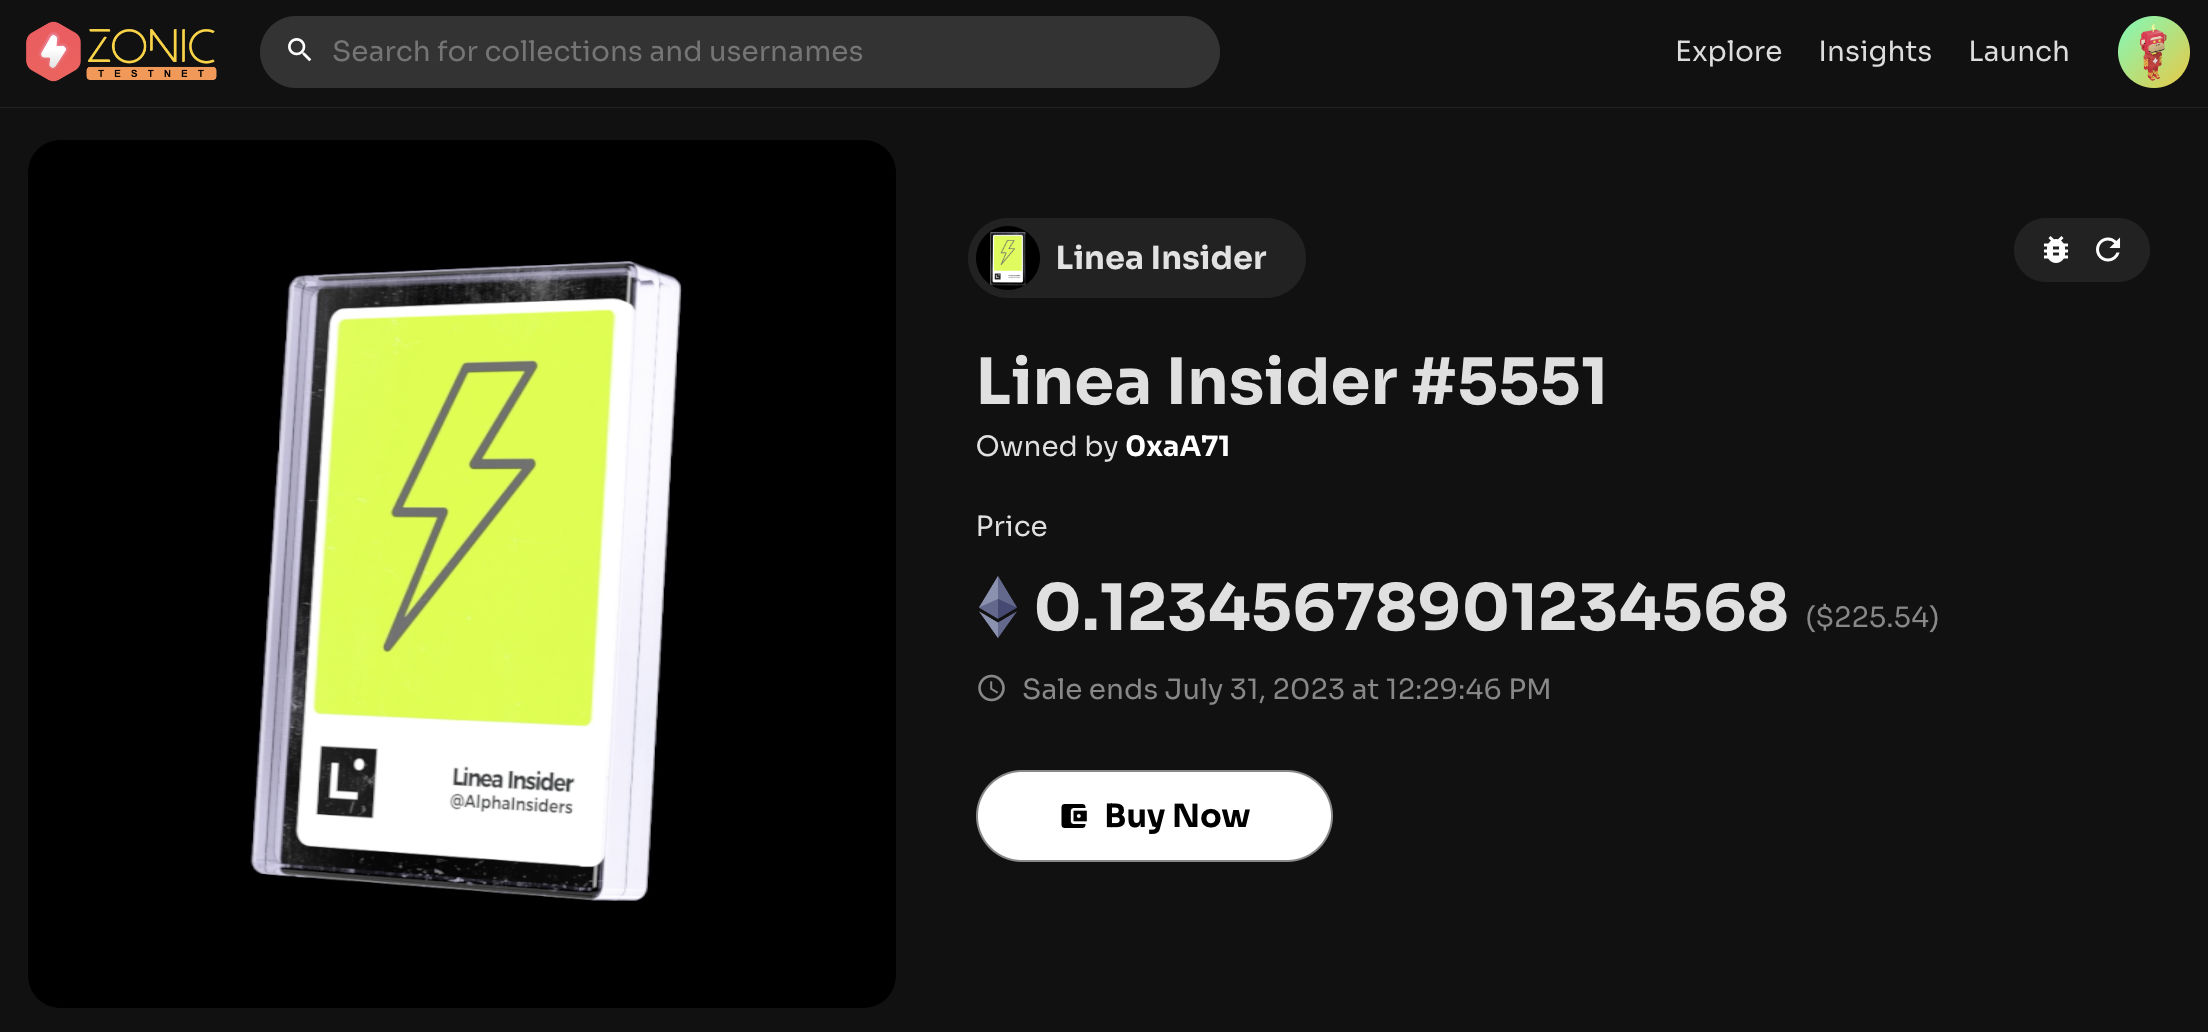
OpenZonic official website, click the "Explore" button at the top to browse the NFT listed on the platform, choose one you like, click "Buy Now" to pay the fee, and wait for the transaction on the chain to complete. As follows:
Open
OpenZonic official website, connect to the wallet to authorize login, open "My NFT" to view the NFT you own on the Linea test network; select the Linea Ape Zonic NFT of our previous task Mint, click "Transfer NFT", enter the delivery address, and wait for the transaction on the chain Done.
At this point, congratulations, you have completed a total of 20 tasks in the third week. Odaily will also continue to update other tasks of the future Linea test network, so stay tuned.